Project 1 - Reflections
Reflections are a creative and different way of creating abstract and surreal images. They have been used by photographers for decades to create photographs that capture many different subjects and turn them into one.

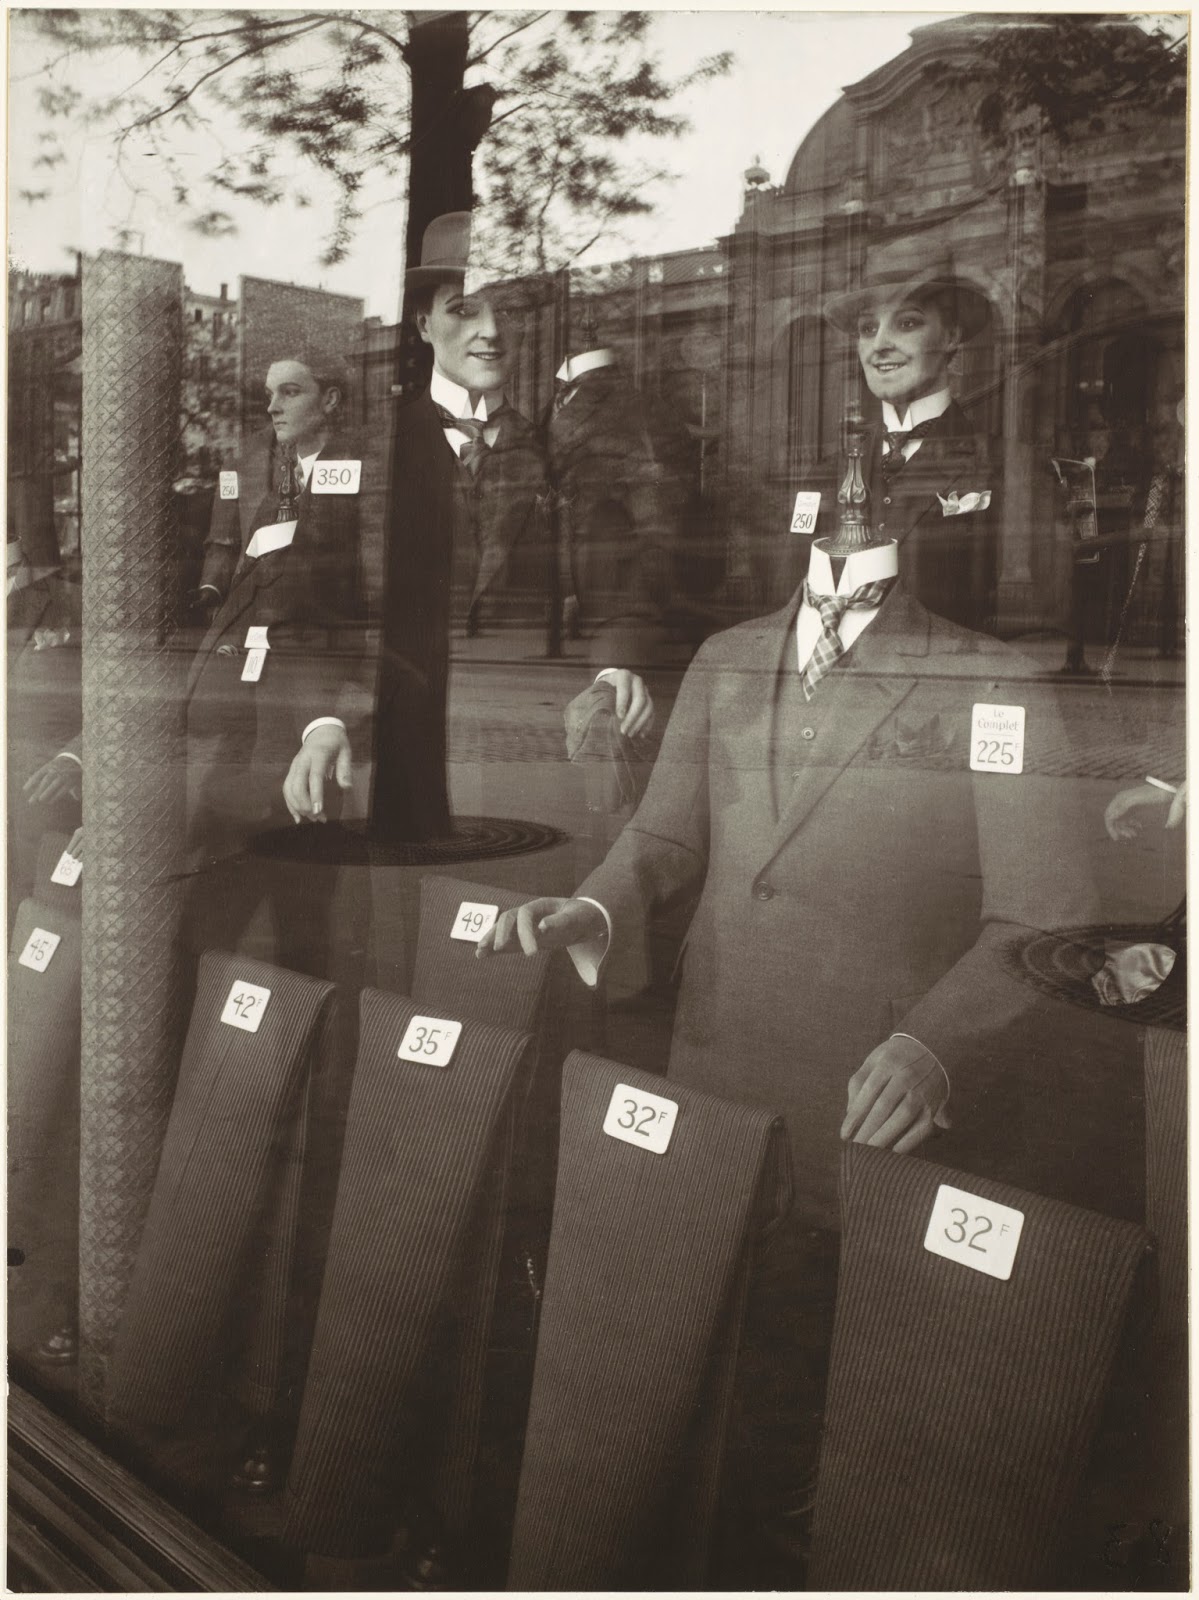
Eugene Atget's reflection photography is really interesting because it is quite surreal. This is mainly because the mannequins are from a completely different era so the fashion style is outdated which is why they seem so surreal and unique.

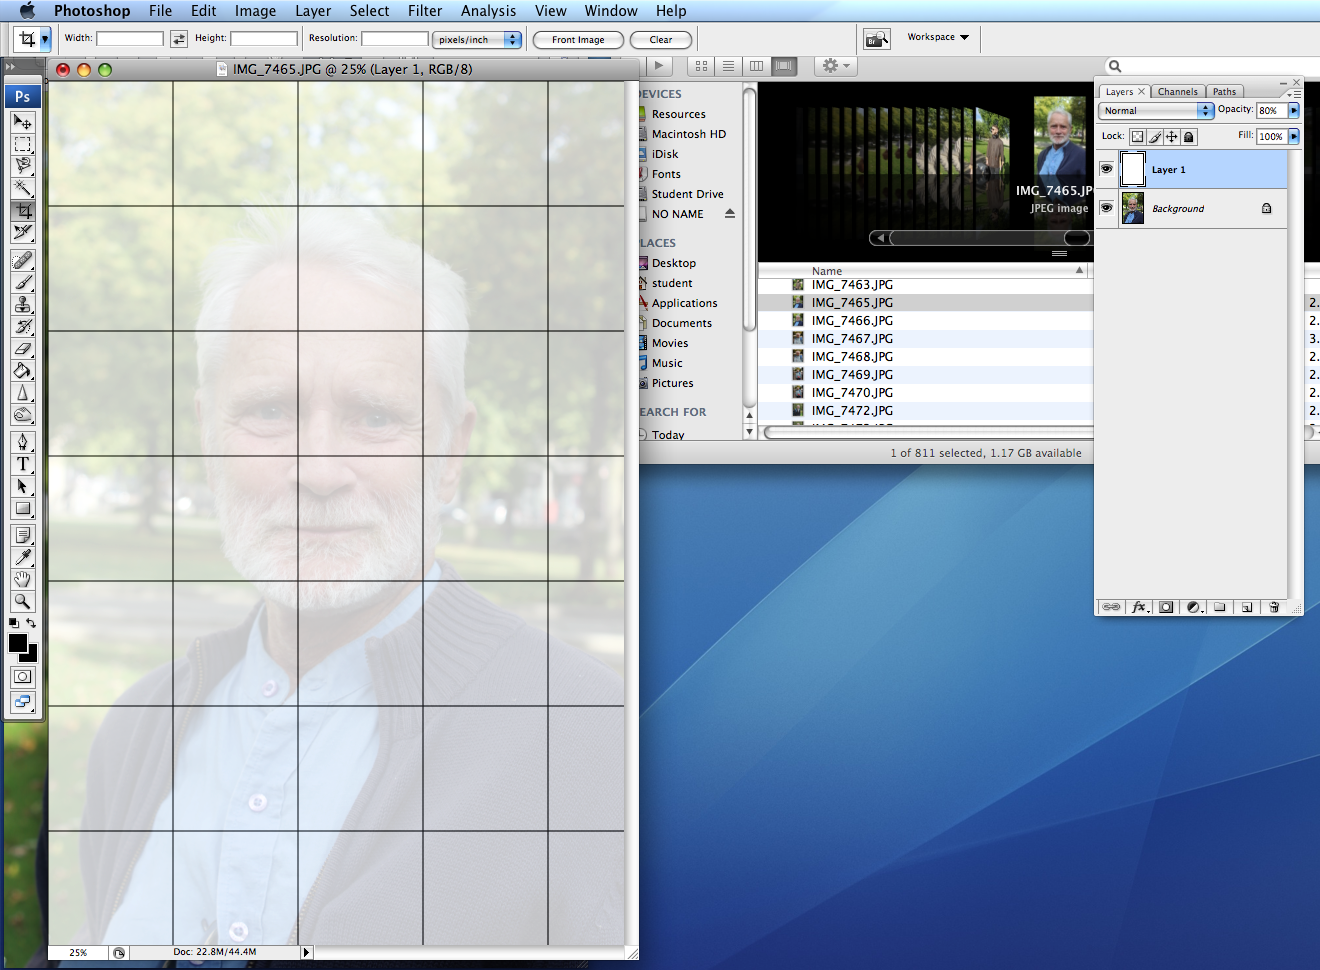
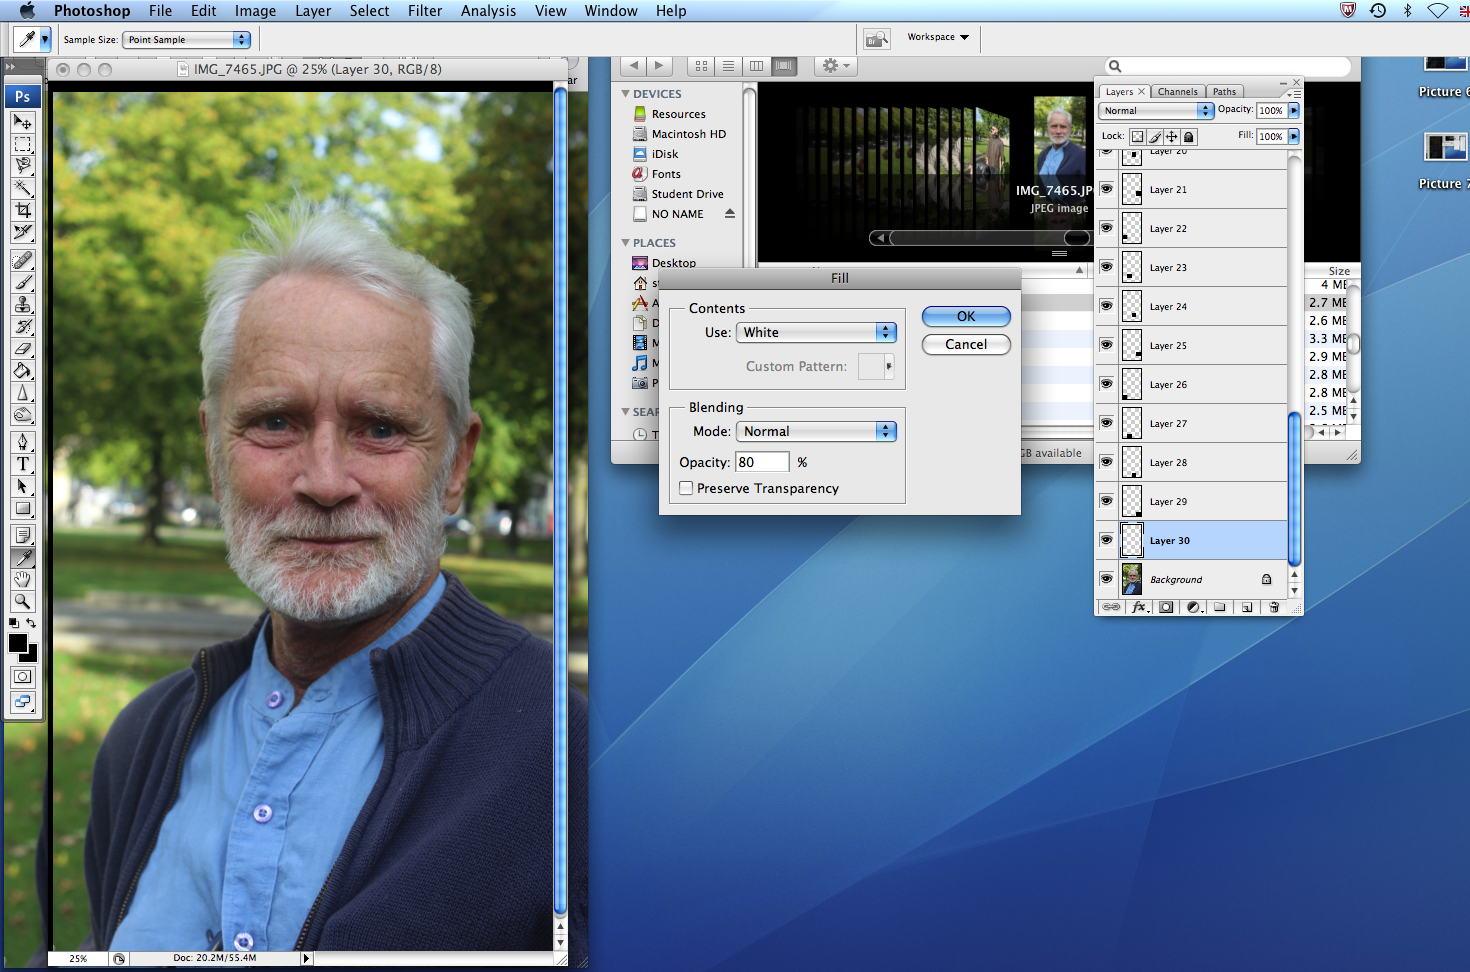
 Here are my best 3 images. As you can see I attempted to make it seem as if the the mannequins are actually stood on the street. The first image works well but is less realistic because the mannequins don't have heads and also I feel that it is a bit too close up. The other two images work quite well because the they look quite real and also the angle that the photo was taken is a lot better and so includes the pavements and buildings to make the mannequins seem as if they are stood on the street.
Shop Windows
Eugene Atget is a good example of this as he used to photograph shop windows. In the shop windows there were often mannequins and the window would reflect the street so it looked as if the mannequins were standing on the street if you look closely enough. Eugene Atget photographed around Paris between 1897 - 1927.Own Reflections
Taking inspiration from Eugene Atget's reflection photography I went out on to Park Street and attempted my own reflection photography. Here are my best 3 images. As you can see I attempted to make it seem as if the the mannequins are actually stood on the street. The first image works well but is less realistic because the mannequins don't have heads and also I feel that it is a bit too close up. The other two images work quite well because the they look quite real and also the angle that the photo was taken is a lot better and so includes the pavements and buildings to make the mannequins seem as if they are stood on the street. 
Evaluation
I really enjoyed taking photographs of the shop displays and experimenting with different angles to get the best results. I feel my photos have many similarities to Eugene Atget's just with a modern twist. If I were to do this again I would take more time to plan how I wanted my photographs and also spend time researching the most interesting location.
Mirrors
For this exercise we had to take interesting photos with help from a mirror. I decided to go to Brandon Hill because there's a wide range of different subjects to photograph that had the potential to look interesting and unique with the help of a mirror.
 In this photograph the flats can be seen in between the trees, so what I did was line the mirror up with the trees at a diagonal angle so that the reflection of the tree branches look as if it is lined up with the actual tree. With the mirror being at an angle it made the building look as if it is on it's side which gives the image a disjointed effect. Due to the lighting bouncing off the edges of the mirror, it blended nicely with the background to help make the image look as if it is one subject.
In this photograph I placed the mirror at the end of the rails, just where the rails go towards the ground, and reflected what was opposite to my position. I lined the reflection up with the rails to give it a slightly more realistic effect. Once in editing, I rotated the photograph horizontally so that the image was upside down to give it a unique effect.

Evaluation
I had fun experimenting with the mirrors as it was a technique I had never thought of using before. At times it was a struggle to find the best position for the mirrors and so turned in to a case of trial and error when taking the photographs. Although I had fun taking these photos I can't say that it has been my favorite task because I felt quite restricted with the mirror, mainly because it was quite difficult to hold the mirror and take the photo at the same time.
Project 2 - Pinhole
Pinhole photography is where the camera does not have a lens with a small aperture, the size of a pinhole. This camera is effectively a light proof box with a small hole in one side. The light from the scene being photographed passes through the hole and projects on to photographic paper on the opposite side of the box. Inside the box it is completely blacked out to prevent light from spilling in and ruining the photographic paper. Due to a pinhole camera needing a long exposure time, the shutter is usually manually operated. This is done by using a light-proof flap to cover and uncover the pinhole.
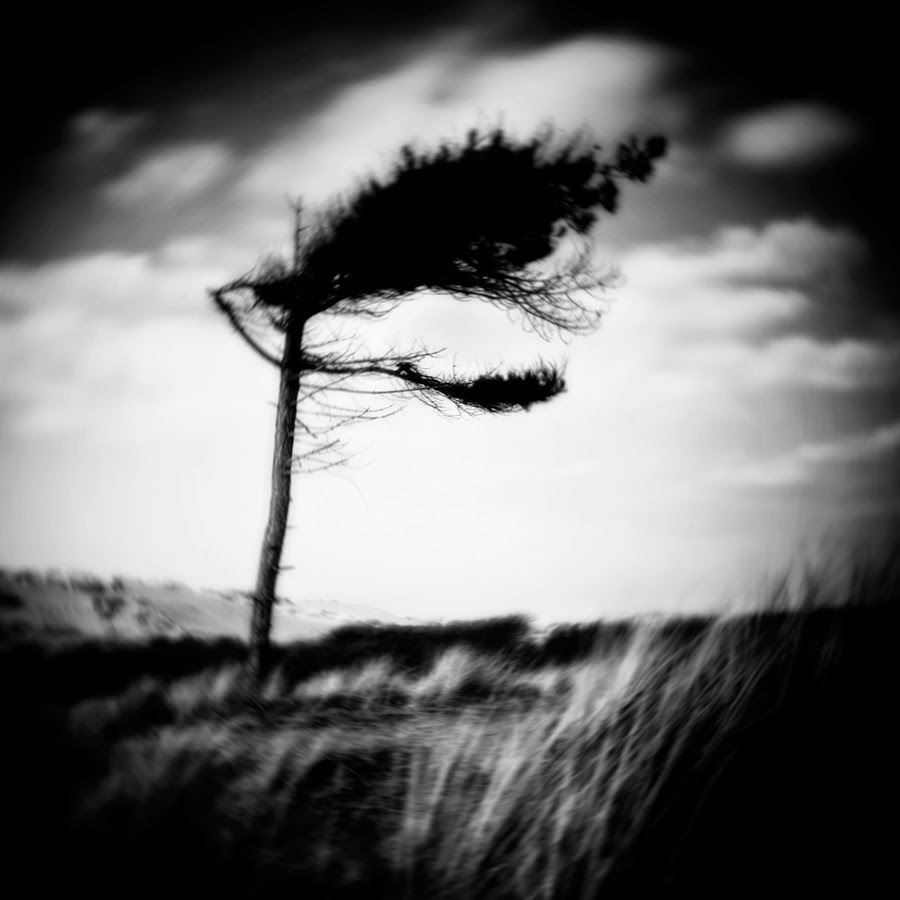
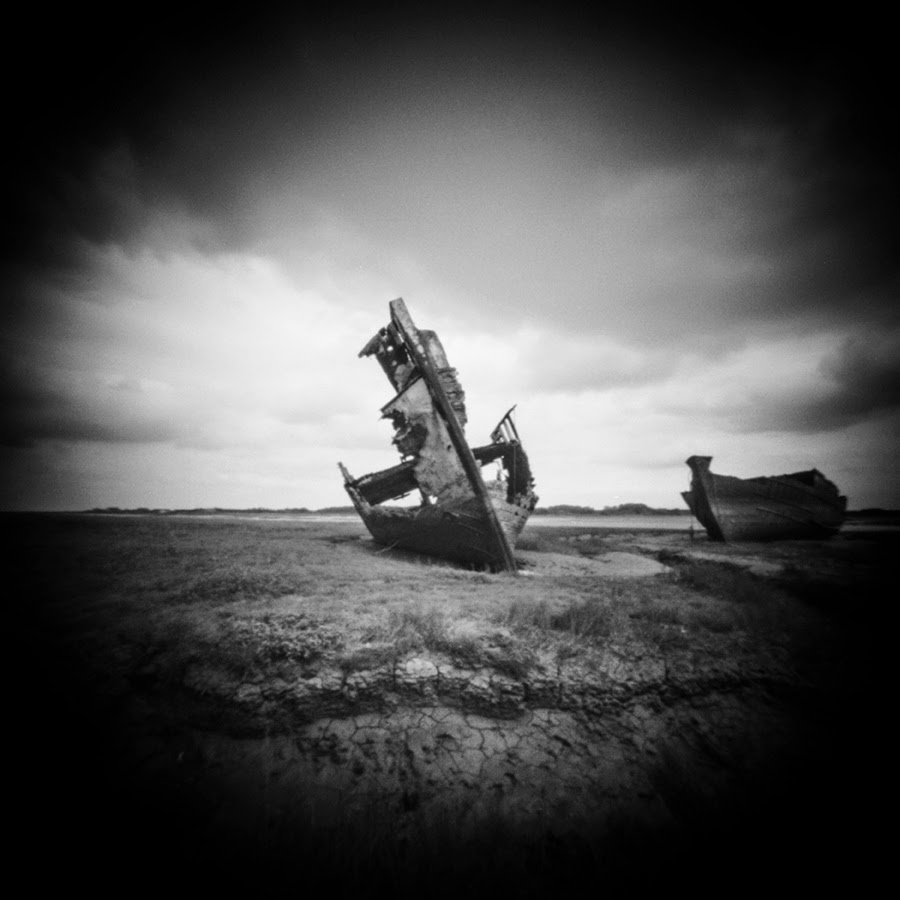 Here is an example of pinhole photography. These photographs were taken by Steve Ashton, a landscape and fine art photographer. As you can see the photograph has been over exposed at the edges which is why they are black, this is typical for a lot of pinhole images. Also due to the long exposures the clouds and the grass are less in focus because they did not stay still for the time that the photograph paper was exposed.
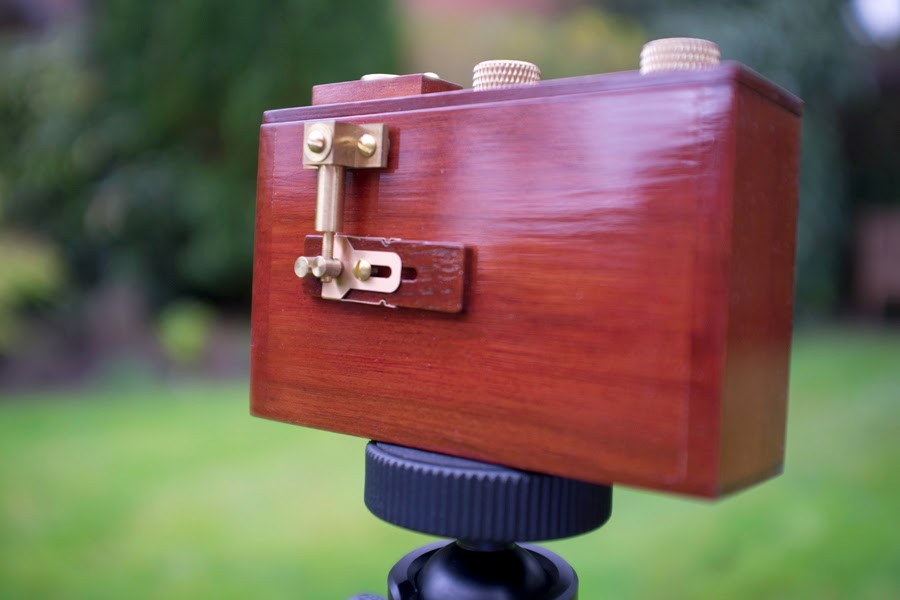
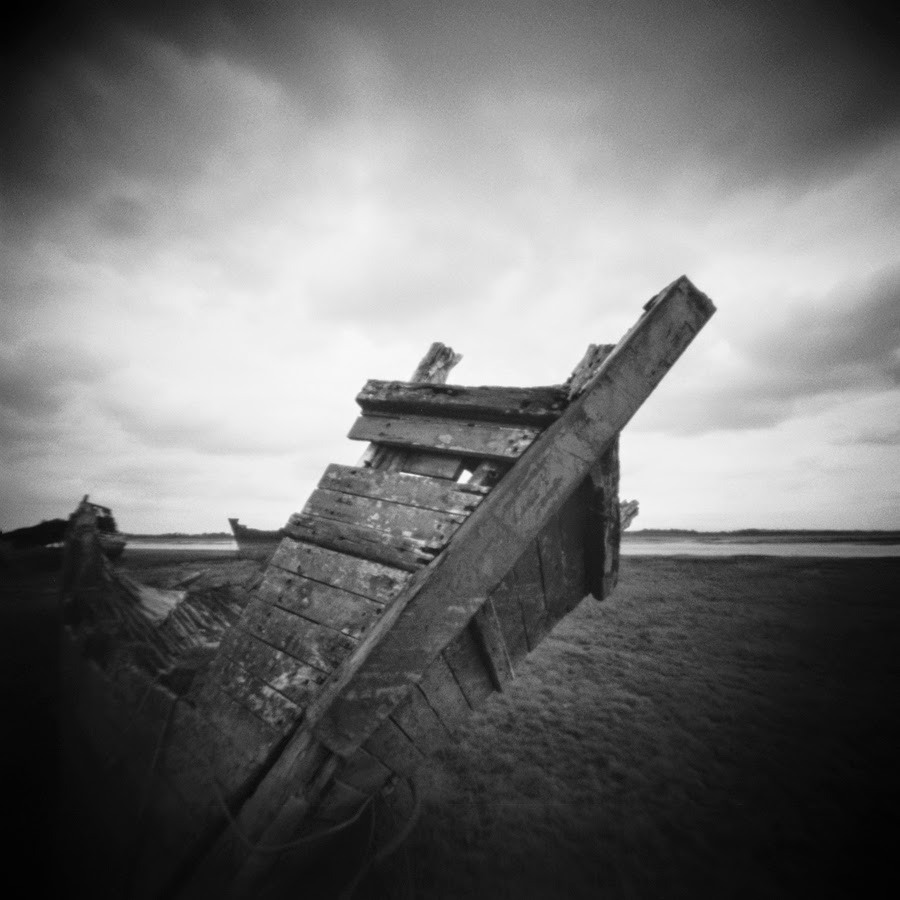 Steve Ashton took his pinhole photographs using a Zero Image 2000 6x6 pinhole camera. He chose to use this camera due to it's simplicity, size and the high quality images it produces both in black and white and colour. Also the camera comes with an exposure calculator and a spirit level mounted on the top plate which makes it easier to take pinhole photographs.

My Pinhole photography

 This is the camera I used to take my pinhole photographs. I got an old box and completely blacked out the inside of the box and sealed the edges with black tape to stop any light from leaking in and ruining the photograph. I then cut a rectangular hole out of the back of the box as this is where the pinhole was going to be placed. I got a piece of tin can and made a pin sized hole and then stuck it over the rectangular hole and blacked it out so it couldn't reflect any light. To make my shutter I stuck two pieces of black tape together so that it wouldn't stick to the pinhole and then stuck the top and bottom edges to the box so that the flap would stay on when it wasn't open.
Developing Process
To develop the photographs we had to go into a darkroom and use special developing agents to bring out the photograph and then set it so that it wouldn't carry on exposed when brought out of the darkroom.
 |
| Darkroom |
1.The developer converts the latent image to metallic silver.
2.A stop bath, typically a dilute solution of acetic acid or citric acid, halts the action of the developer. A rinse with clean water may be substituted.
3.The fixer makes the image permanent and light-resistant by dissolving any remaining silver halide salts. Fixer is sometimes called hypo, a deprecated term originating from casually shortened form of the alchemist's name hyposulphite.
4.Washing in clean water removes any remaining fixer. Residual fixer can corrode the silver image, leading to discolouration, staining and fading.
(http://en.wikipedia.org/wiki/Photographic_processing)

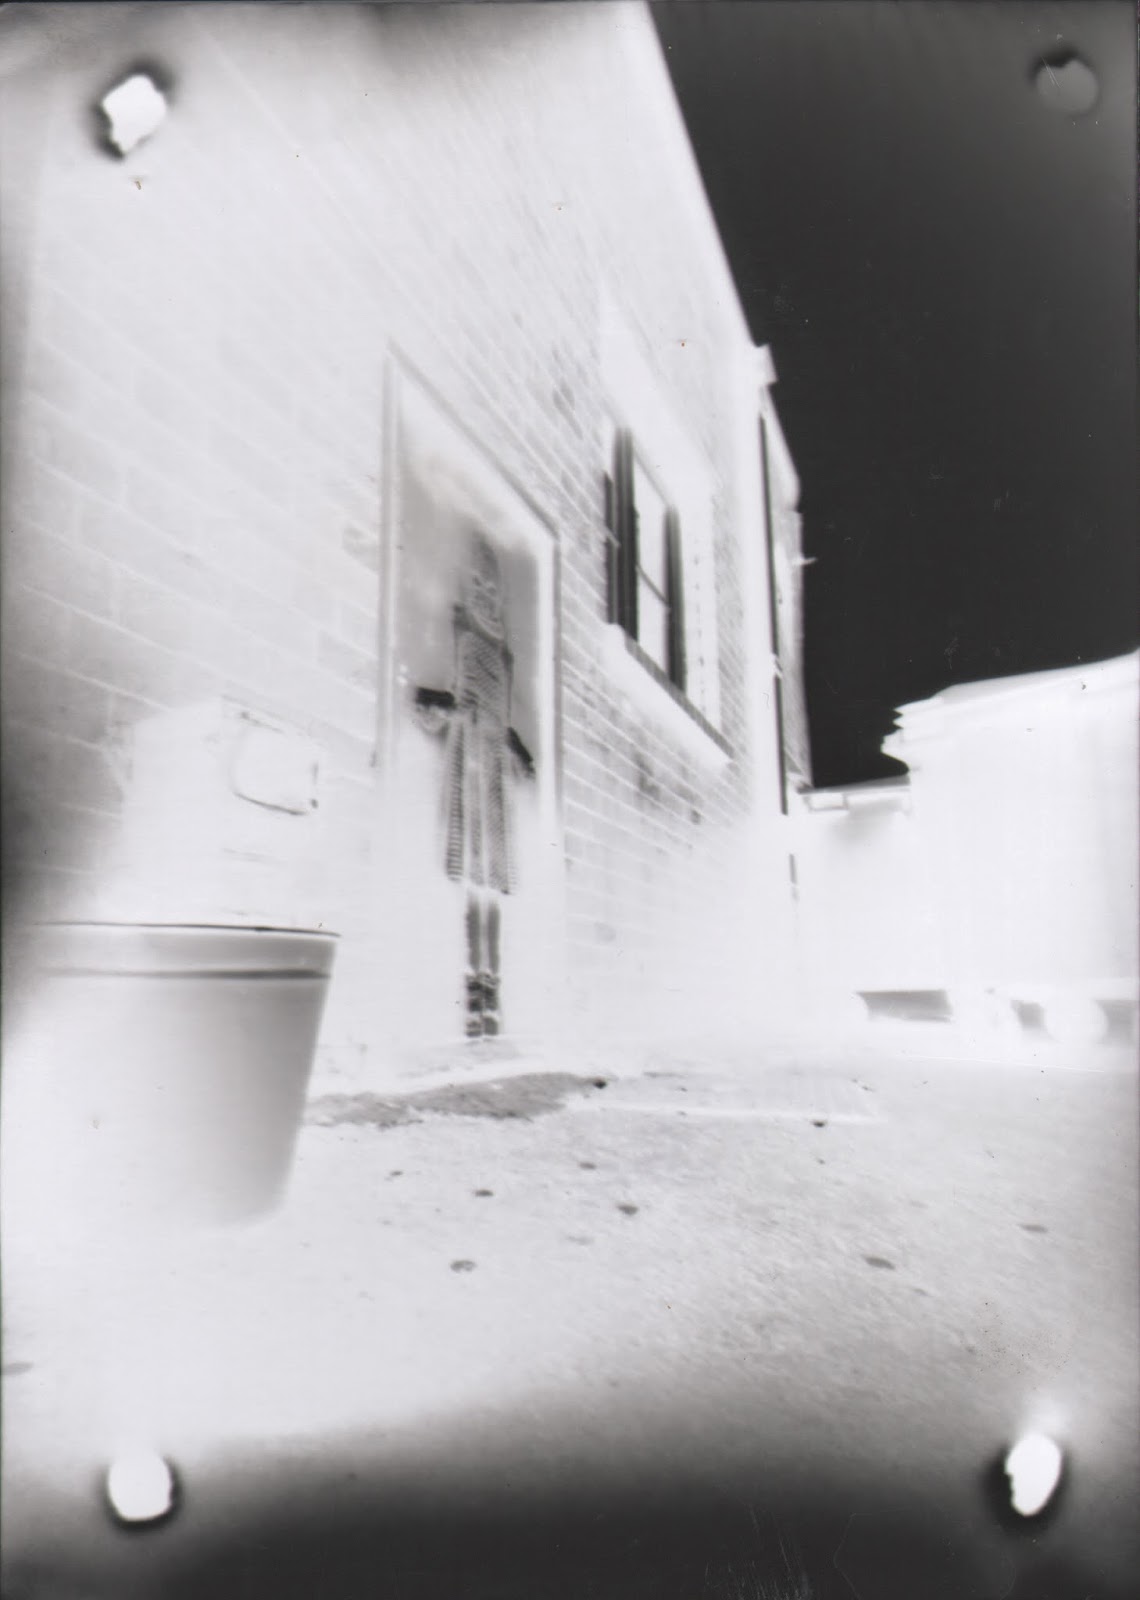
This was my second attempt at pinhole photography. This time I exposed the photograph for a minute and half. I feel this photograph is an improvement of my first attempt as there is more detail in the walls and the bins. Again there was light spilling in around the edges but I tried to hold the box tighter so that less light would get in.
 In my third attempt I decided to change the position of my pinhole camera so that I could capture the graffiti of the girl in a balaclava as I wanted this to be the main focus of my photograph. Unfortunately I over-exposed the photograph as I left it to expose for two and a half minutes. It is obvious that it has been over exposed as the picture is very dark and a lot of the details in the photograph have blended together due to it all being the same shade.
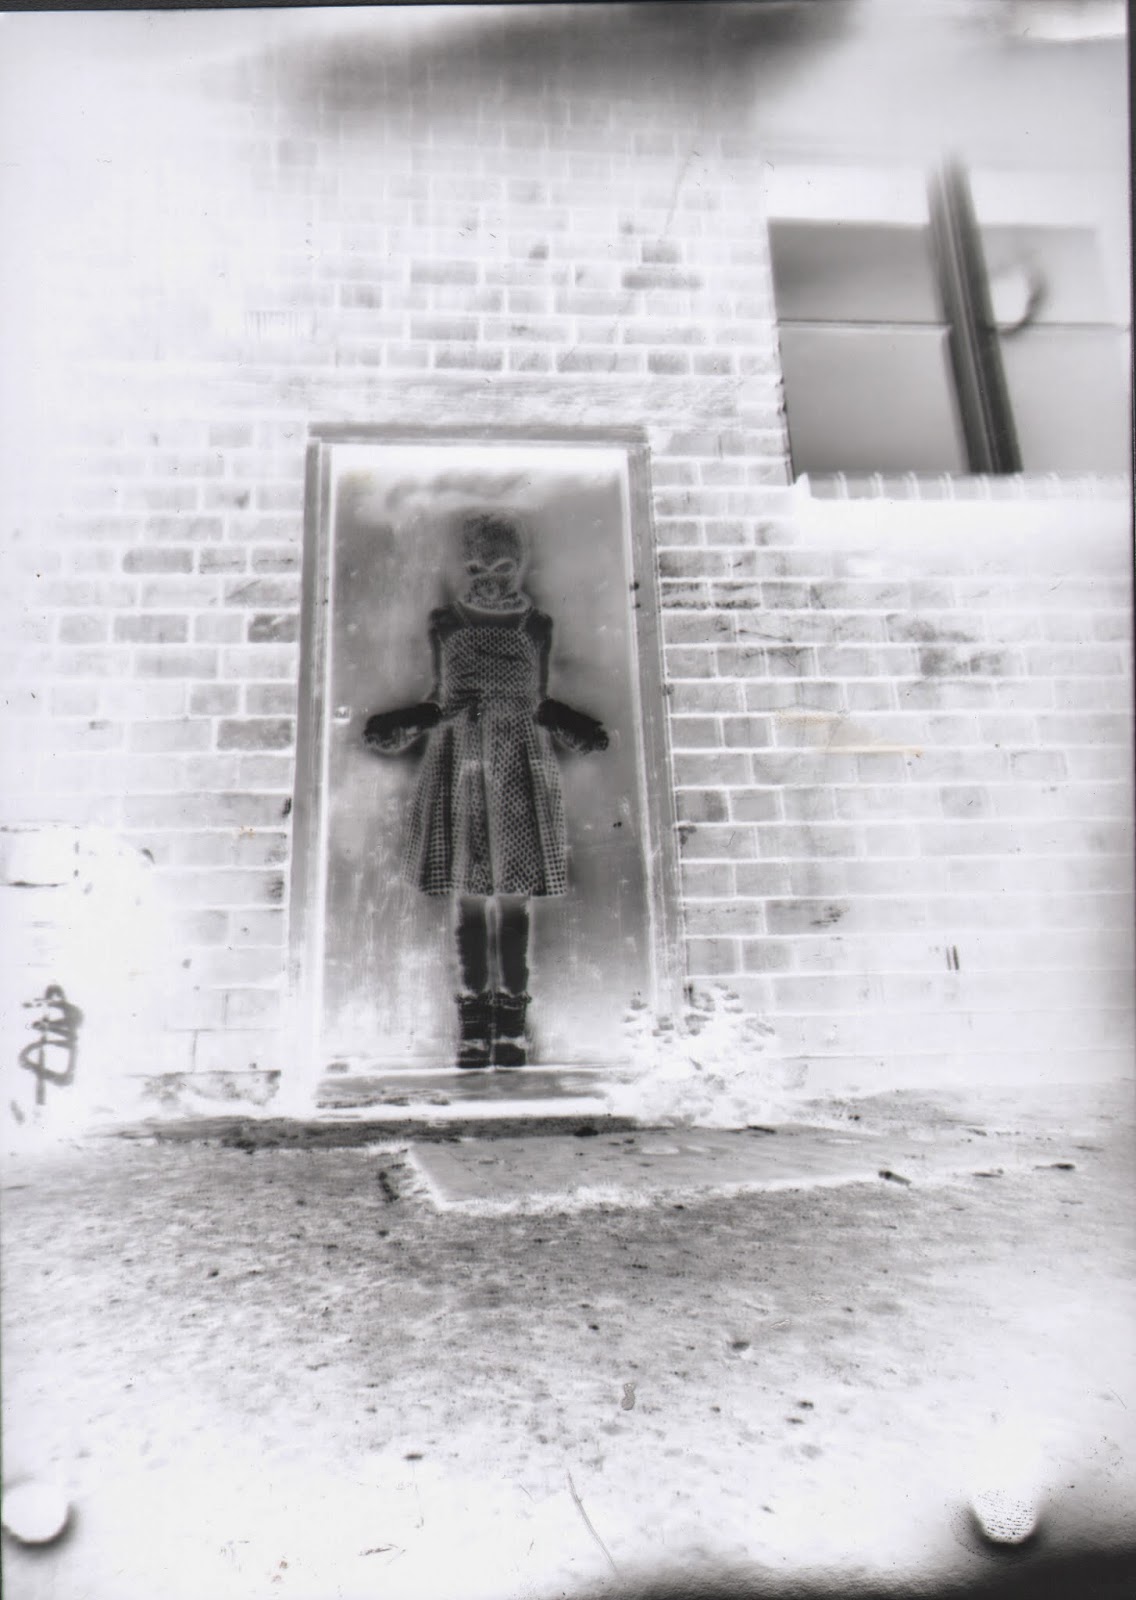
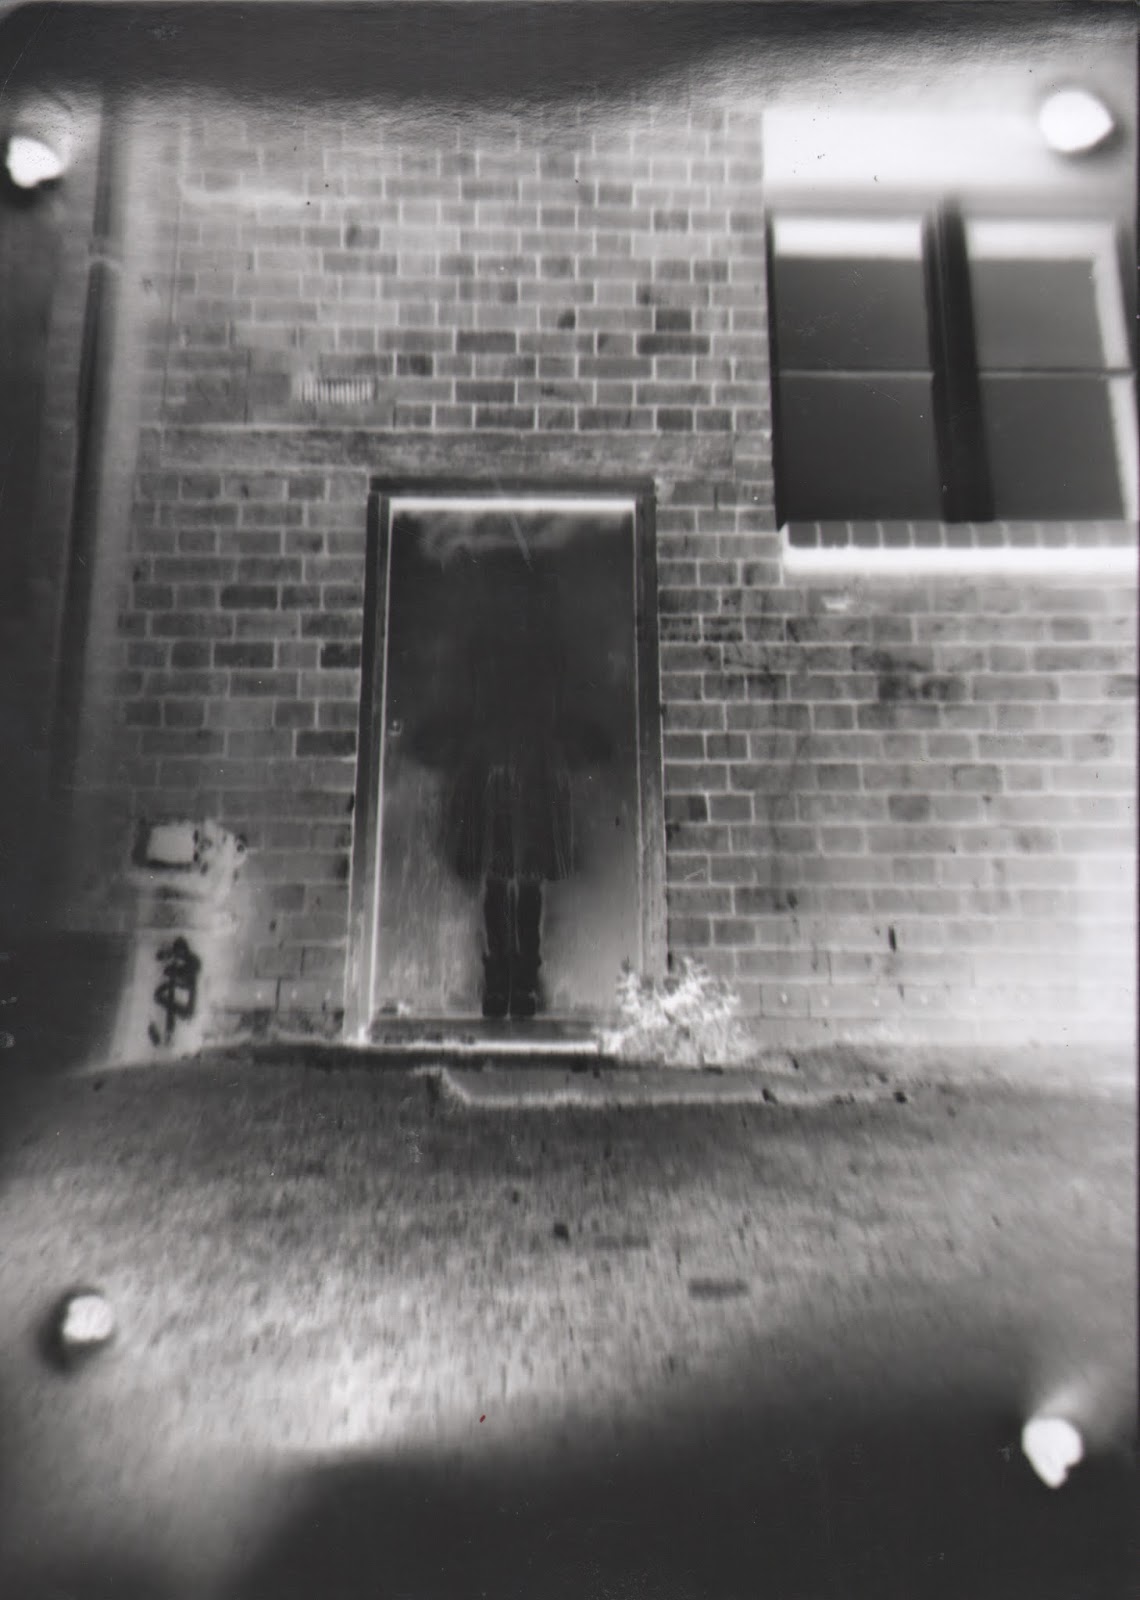
This was my final attempt, as you can see this photograph has had the best outcome. This is because after using a trial and error process I found the best exposure time. I exposed the photograph for one minute and fifty seconds. This seems to create the best effect because the bricks on the wall have a lot detail around the graffiti but then fade out the further away from the graffiti it is, this creates a nice effect because it frames the graffiti. Also the graffiti has exposed really nicely and hasn't lost any of it's detail which makes it stand out in the photograph and make it the main focus of the image. From my previous attempts I found that holding the box as tight as possible prevented a lot of light leaking in, so this time I held the box as tightly as I could which, as you can see, stopped the paper from being too over-exposed around the edges.
Evaluation
Pinhole photography has been one of my most favourite tasks so far because it is so exciting and fun. The whole process kept me interested the whole time because of the element of surprise that comes along with not knowing what your photograph is going to turn out like and then taking it into the darkroom to develop it and watch it appear in front of you. The trial and error part of pinhole photography is a bit tedious but it was a great learning experience because it showed how exposure can really affect a photograph. If I get a chance to do pinhole photography again I'd like to branch out and experiment with people and combine my interest in pinhole photography with my interest in portraiture photography to see what type of results I can get with that.
Project 3 - 360 Panorama's
360 panorama is where you take a series of photographs in a straight line and then in post-production you connect them all together to create one long photograph. 360 Panoramic photographs are good for landscape photography because it allows you to include the whole landscape which can make the photograph a lot more interesting to the viewer and captures the complete moment of when the photograph was taken.
Will Pearson
Will Pearson is a London based photographer who has been experimenting with panoramic photography for around 20 years. He first began experimenting with panoramic photography when he was a child growing up in the Peak District. He has since moved to London and now specialises in capturing the ever changing London sky line.

He has established a very successful career over the years and has been commissioned to do work for many big names.
His photographs are of a very high quality and capture the sharpness of the landscapes and cityscapes that he captures. 
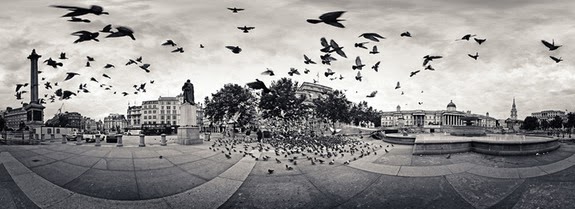 I really like this photograph because of the way Pearson managed to capture the birds both in flight and on the ground. Having the photograph in a greyish/sepia tone gives it an almost nightmarish feel because a lot of the birds captured in flight are blurred and stretched out.
Martin Edwards
Martin Edwards is a Bristol based photographer who does many different types of photography and commercial work. He is most famous for his panoramic photography around Bristol and sometimes other countries. His style of panoramic photography ranges from the standard panoramic to his unique and colourful panoramic photographs.

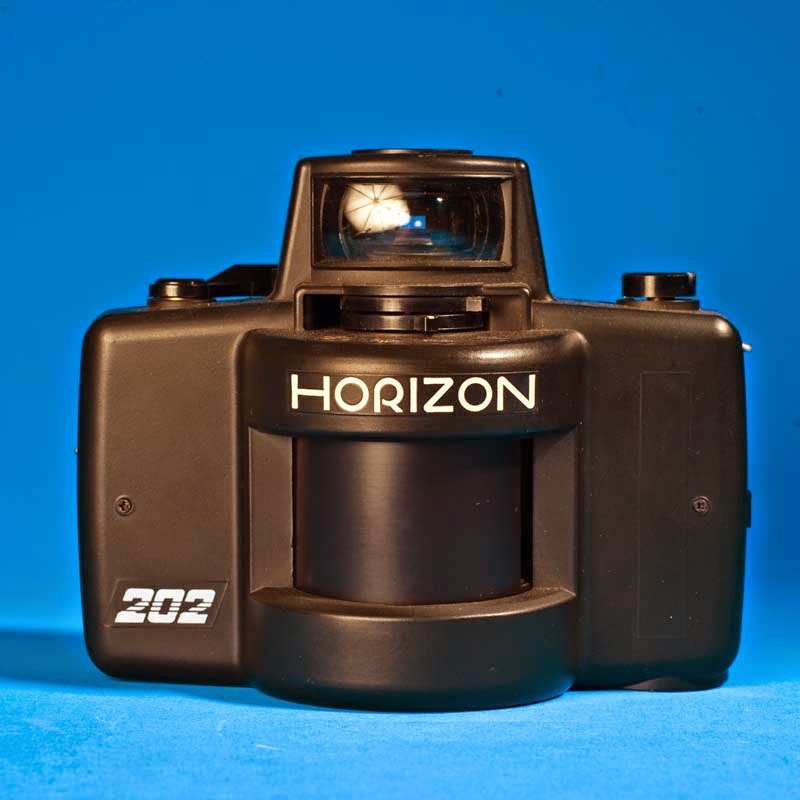
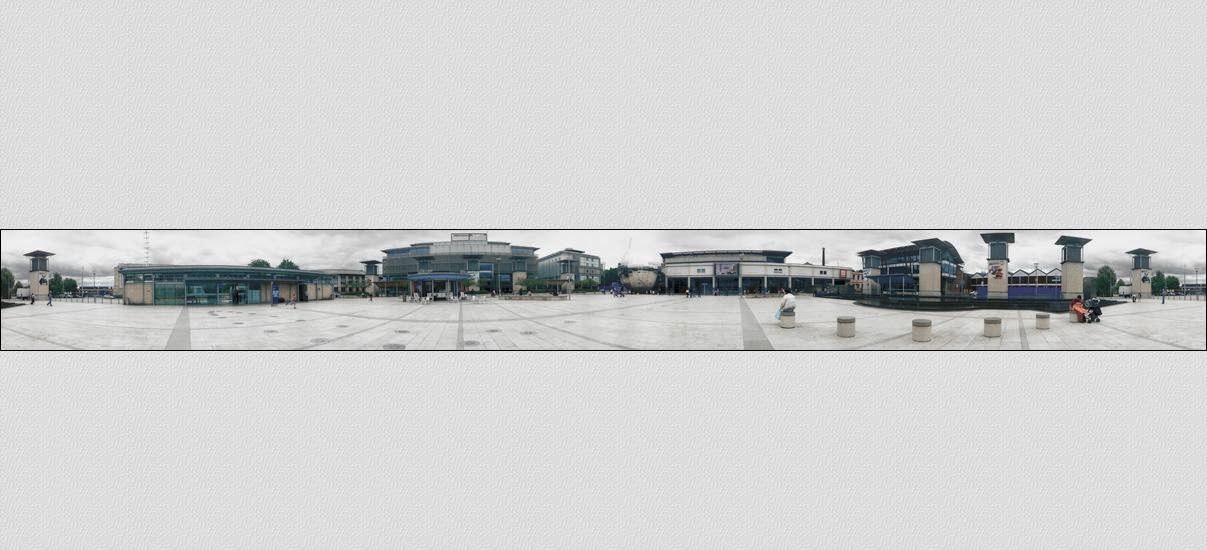 These photographs were taken in the centre of Bristol using a Horizon 202 camera. These photographs capture the essence of Bristol and shows off some of it's best features. The only thing I don't really like about these photographs is how dull they look. Obviously weather conditions have to be taken in to consideration but I feel the photographs would have been better if they were brighter because dull colours tend to be associated to negative moods and descriptions.
Horizon 202 Camera

Here is another style of Edwards' panoramic photography, taken at St Paul's Carnival it really captures the vibrancy of the outfit colours whilst creating a unique style of panoramic photography. These photographs were taken with a lomo spinner camera. This type of photography is called lomography.
I like these photographs because of how vibrant the colours are as it instantly draws your attention. Also because of the blurred and distorted effect it has it makes it more attention grabbing because you instantly try to figure out what Edwards has photographed.
Lomography Spinner 360
The camera Edwards used to capture these images is the Lomography spinner 360.
These photographs were taken in the centre of Bristol using a Horizon 202 camera. These photographs capture the essence of Bristol and shows off some of it's best features. The only thing I don't really like about these photographs is how dull they look. Obviously weather conditions have to be taken in to consideration but I feel the photographs would have been better if they were brighter because dull colours tend to be associated to negative moods and descriptions.Horizon 202 Camera
- The horizon 202 camera is a mechanical swing-lens panoramic camera
- The camera was produced in the 1950's by a Russian company
- It is a 35mm film camera
Here is another style of Edwards' panoramic photography, taken at St Paul's Carnival it really captures the vibrancy of the outfit colours whilst creating a unique style of panoramic photography. These photographs were taken with a lomo spinner camera. This type of photography is called lomography.
I like these photographs because of how vibrant the colours are as it instantly draws your attention. Also because of the blurred and distorted effect it has it makes it more attention grabbing because you instantly try to figure out what Edwards has photographed.
Lomography Spinner 360
The camera Edwards used to capture these images is the Lomography spinner 360.
- It is a 35mm film camera
- The shutter is manually operated
- It has two aperture settings for sunny (f/16) or dull days (f/8)


My 360 Panoramas
Outside Panorama

For this photograph I went down to the Lloyds head office by the Bristol Harbourside. I chose to take my outdoor 360 panorama here because it is a beautiful location and ,taking inspiration from Martin Edwards, I wanted to take a panoramic photograph of one of Bristol's most iconic areas. When taking the photographs I made sure that I kept the camera in the same position except to rotate it. This made it possible for the photographs to be put together evenly in Photoshop. Once the photographs were put together in Photoshop, I then cropped the photograph down so that it didn't have any white edges.
When taking the photographs I struggled to get the camera at the right height and angle to get all the tall objects within the frame. I had to sacrifice the top of the bell tower as it was just too tall to fit in the frame.
Indoor Panorama

For this panorama I went into the Bristol Cathedral as the interior of the church is beautiful and is the perfect setting for a panorama photograph as it helps to show the entire beauty of the church in one photograph. I took roughly 18 photographs for this panorama.
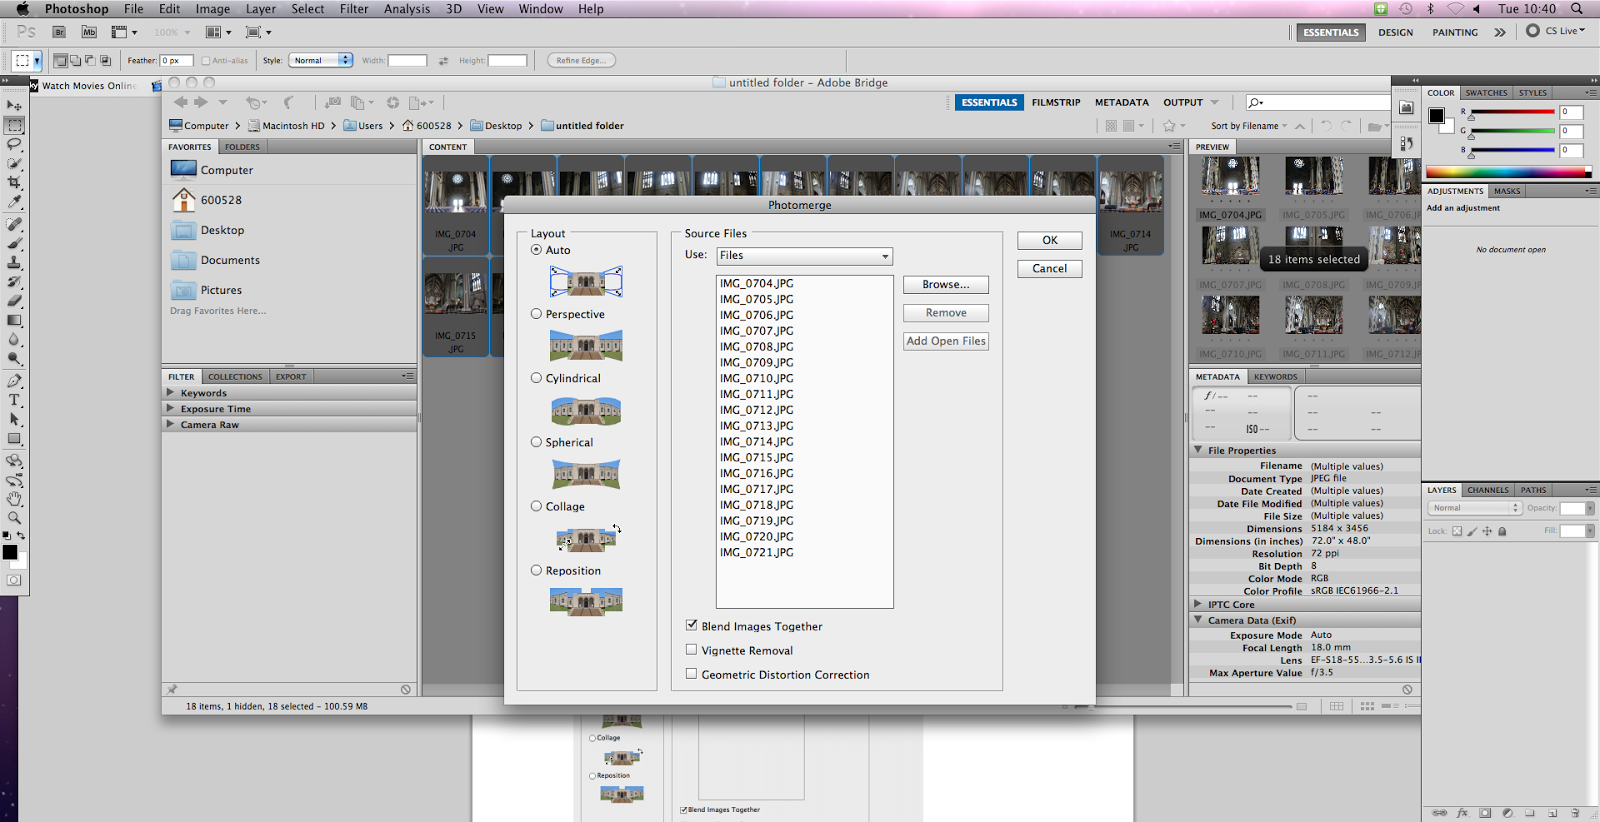
The first stage was to open the photographs in Adobe Bridge and the go Tools > Photoshop > Photomerge. This opens a menu where you choose the layout of the panoramic photograph.
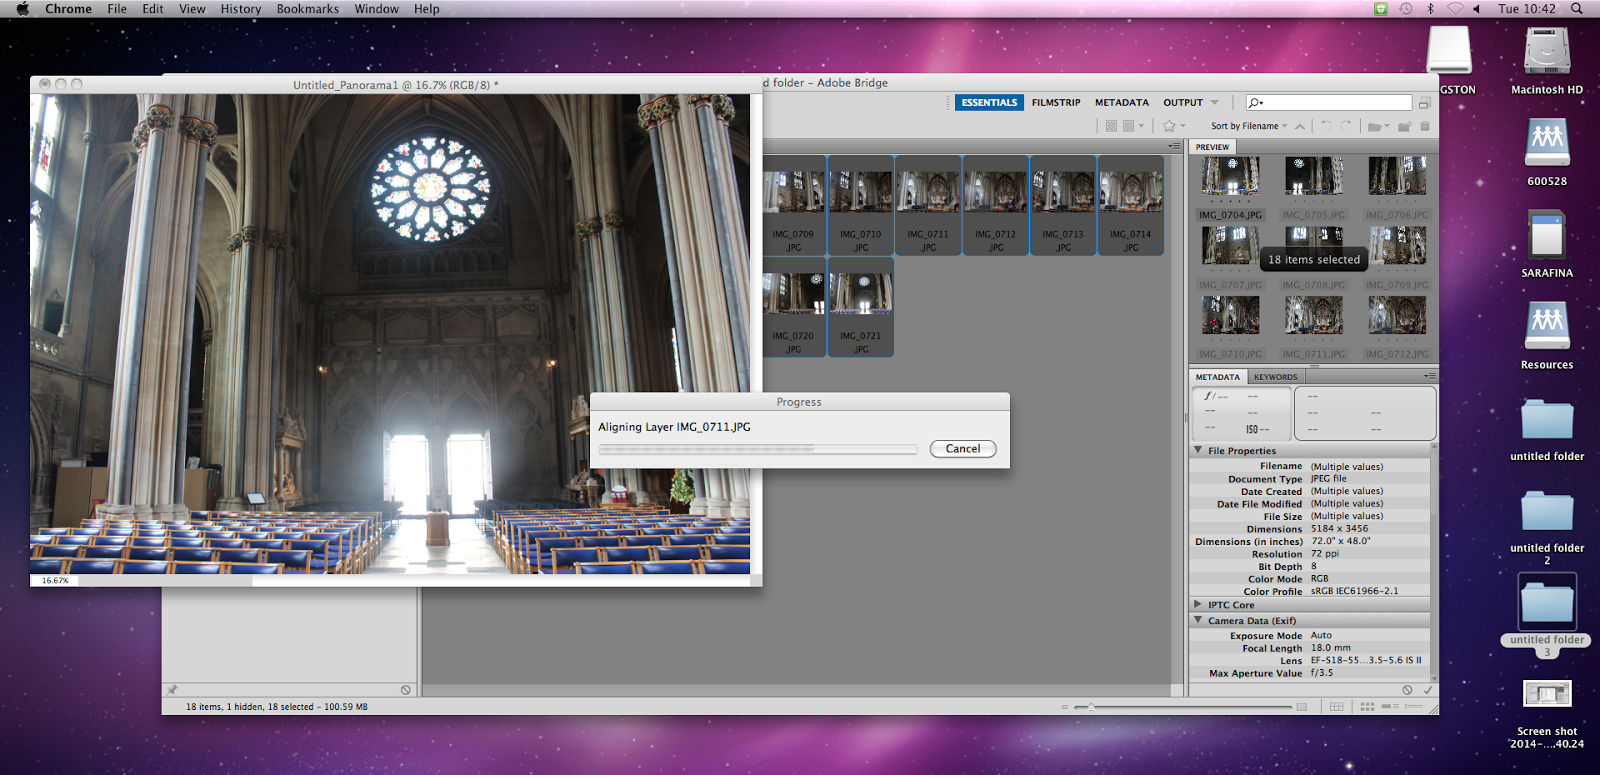
Once I chose which layout I wanted I clicked OK which then led to Photoshop to begin processing the images.
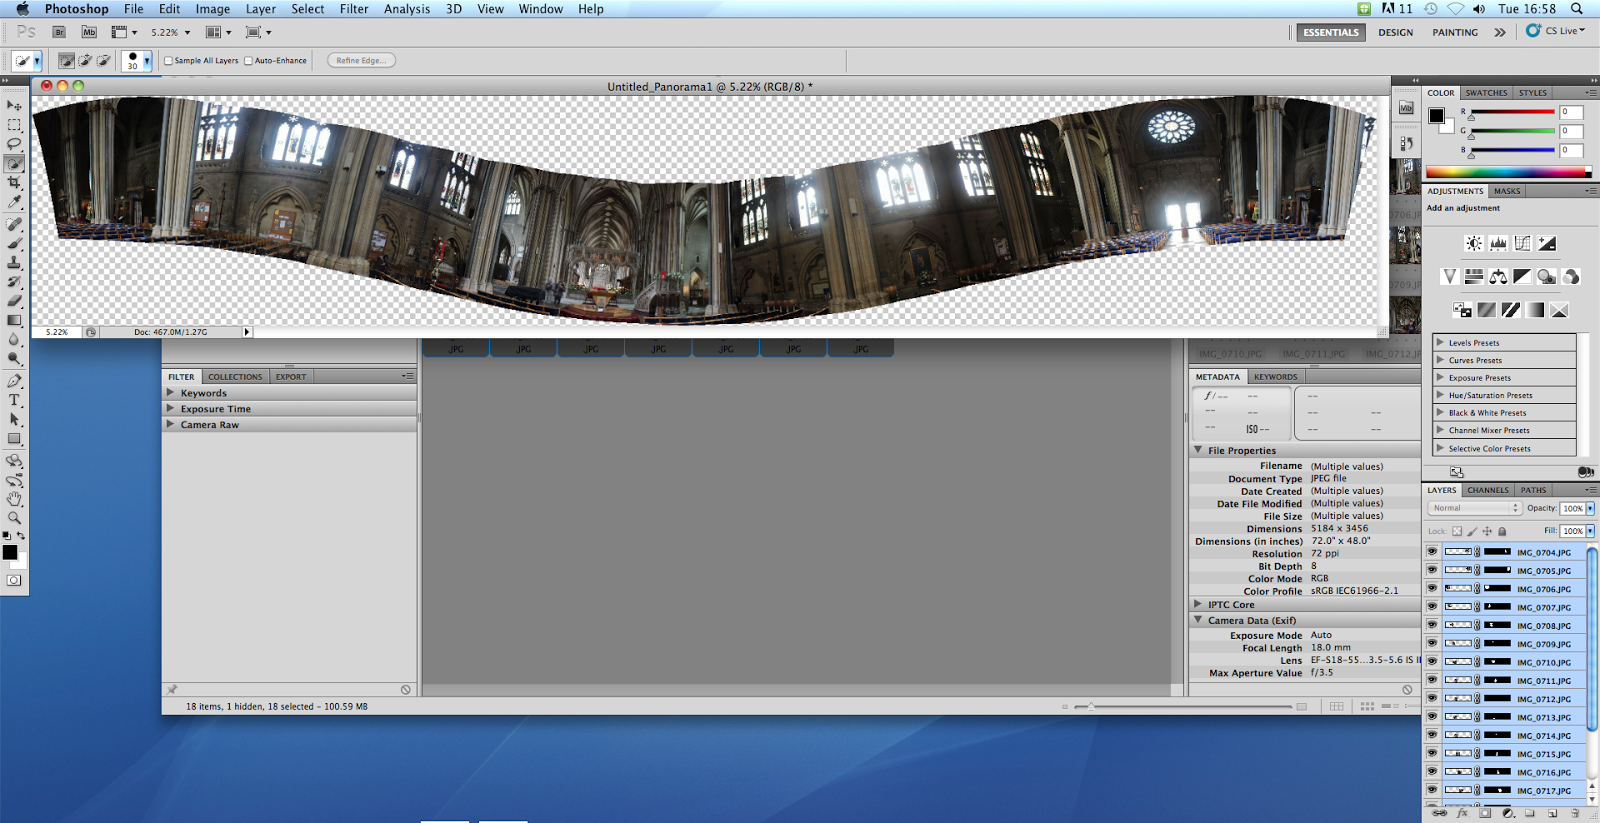
After Photoshop had finished processing the images and had made them into a panoramic photograph I had to flatten the image as there were 18 different layers which made the file size of the photograph much too big.
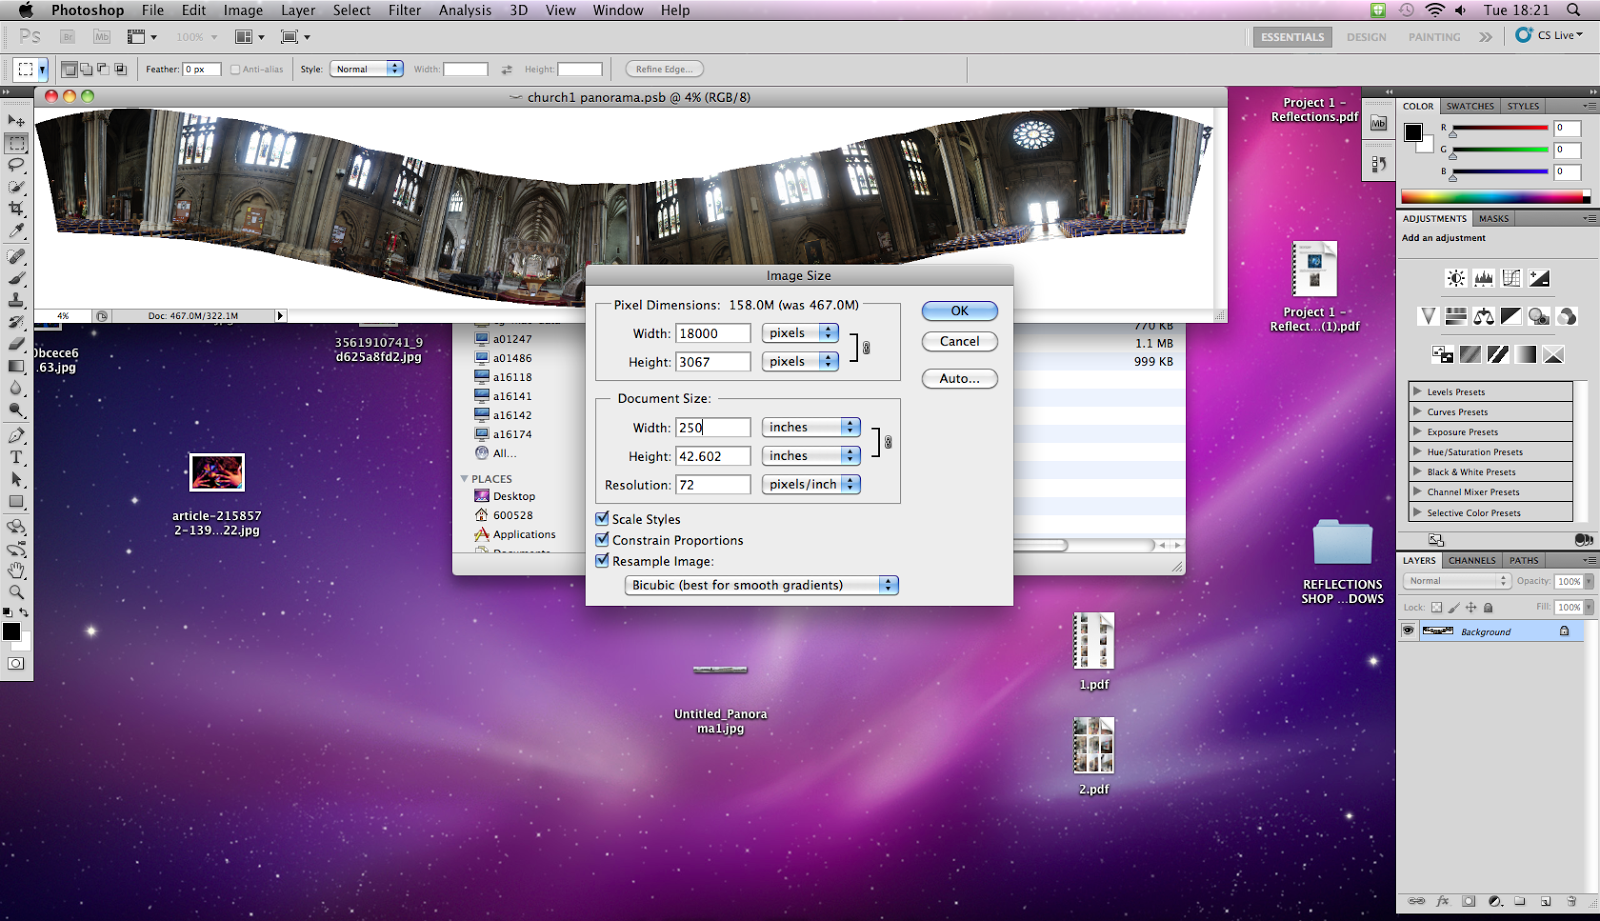
After I flattened the image I went on to Image > Image size and changed the document size width to 250 inches. This made the image a lot smaller and then allowed me to save it as a JPEG file.
Evaluation
Overall I am pleased with the outcome of both my indoor and outdoor 360 panoramic photographs. There isn't too much inconsistency with the exposure of the images which is often a problem due to lighting changes caused by slight changes to the weather when taking the photographs. If I had the opportunity to experiment with 360 panoramic photography again I would take the time to research the best location and also take the time to practice taking the photographs before the actual shoot. This is because I found it very frustrating when taking my photographs because I was inexperienced and so the camera kept moving out of the position and so the photographs would be at different angles which meant I had to start again, this was very time consuming and frustrating.
Project 4 - Hockney Joiners
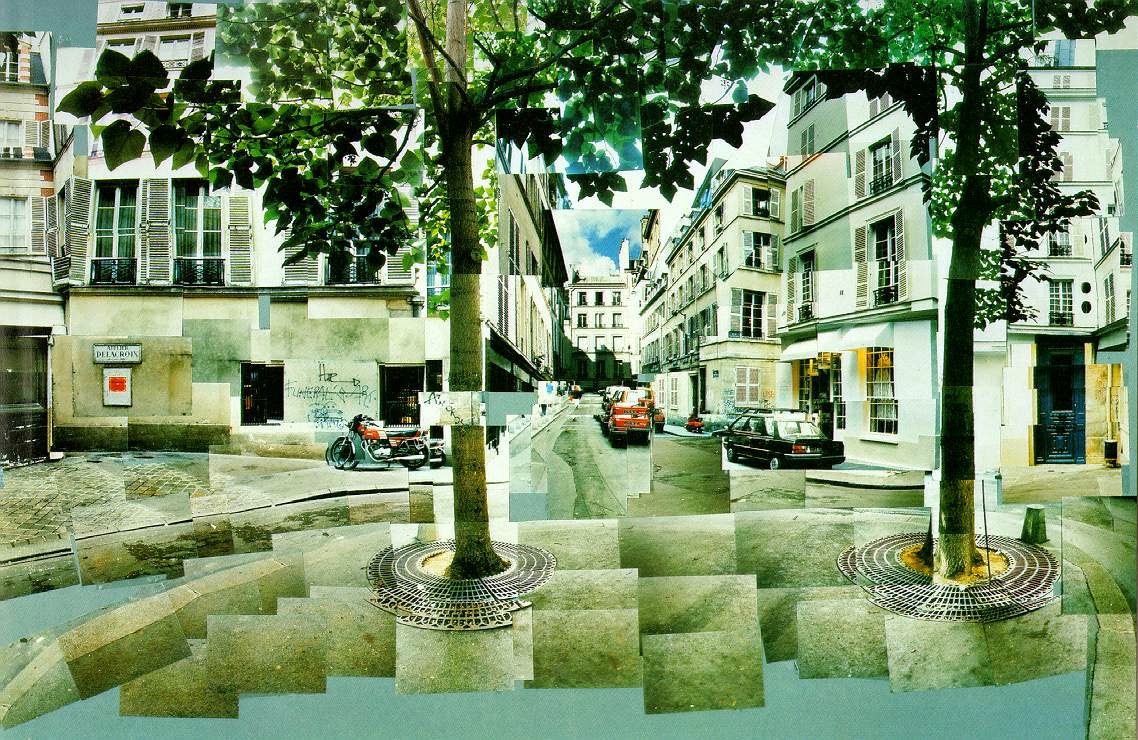 Hockney Joiners is a style of photography named after David Hockney, a British painter and photographer. He first began creating Hockney joiners in 1970 by taking a series of photographs of a living room, using a Polaroid camera, and then joining them together to create one large image so that he could use it as reference when creating a painting of the living room. He found that the collage of images was an art form in itself and so he began to create more Hockney Joiners.
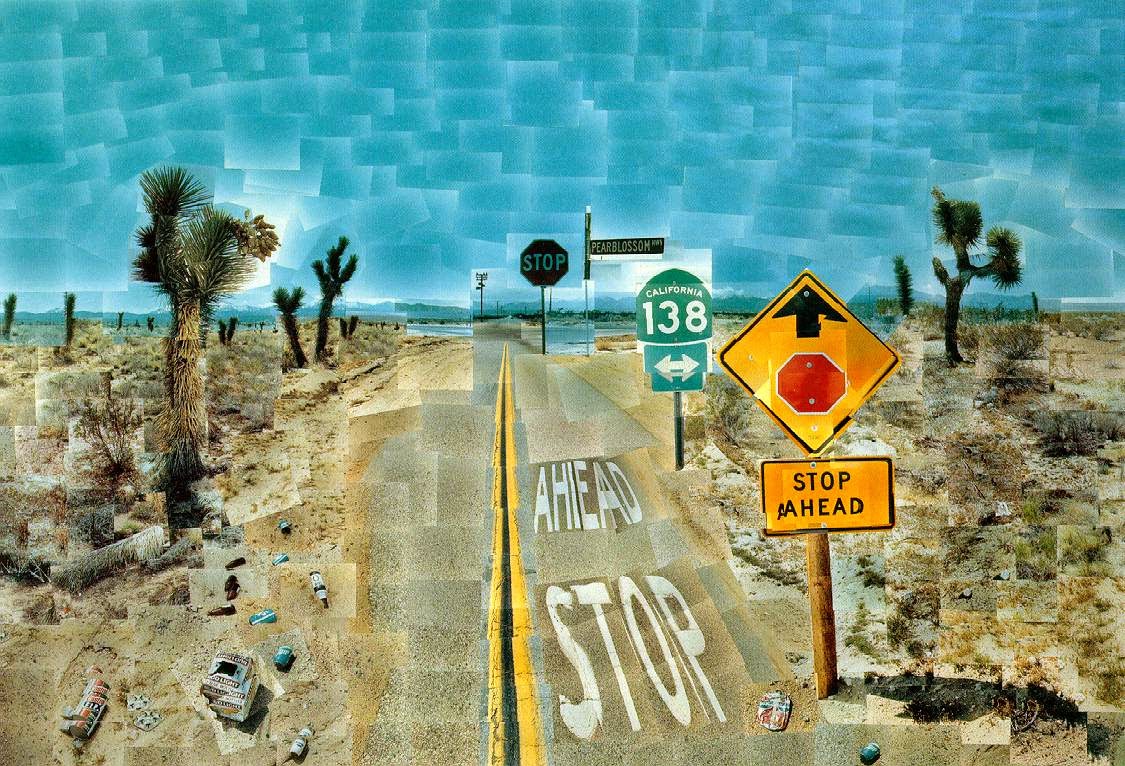 To create a Hockney Joiner you have to take between 30-40 photographs of a subject, and then in post-production you have to put them all together to create a collage of the scene. With Hockney Joiners, the photographs often don't line up which creates a type of optical illusion because at first glance it is not obvious that the photographs do not line up, it's only when you look closer that you realise the images are overlapping each other at different angles. This is because there is often a main focal point in the photograph, typically placed in the centre, that is placed normally with the other photographs around it placed at different angles.
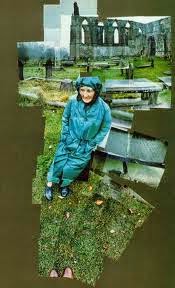
Hockney would use a film camera to take his photographs and then get them developed in various shops. He found that these shops would produce slightly different photographs with the exposures being either slightly over-exposed or under-exposed. The weather also played a part in the different exposures of the image because it would take time to take the many different photographs and so over this time clouds would come over and make the sky overcast and then disappear to make the sun shine.
One of Hockney's trademark's would be to include his feet in the image. This often gave the photograph a sense of perspective and made it obvious that it belonged to David Hockney.
Own Hockney Joiners
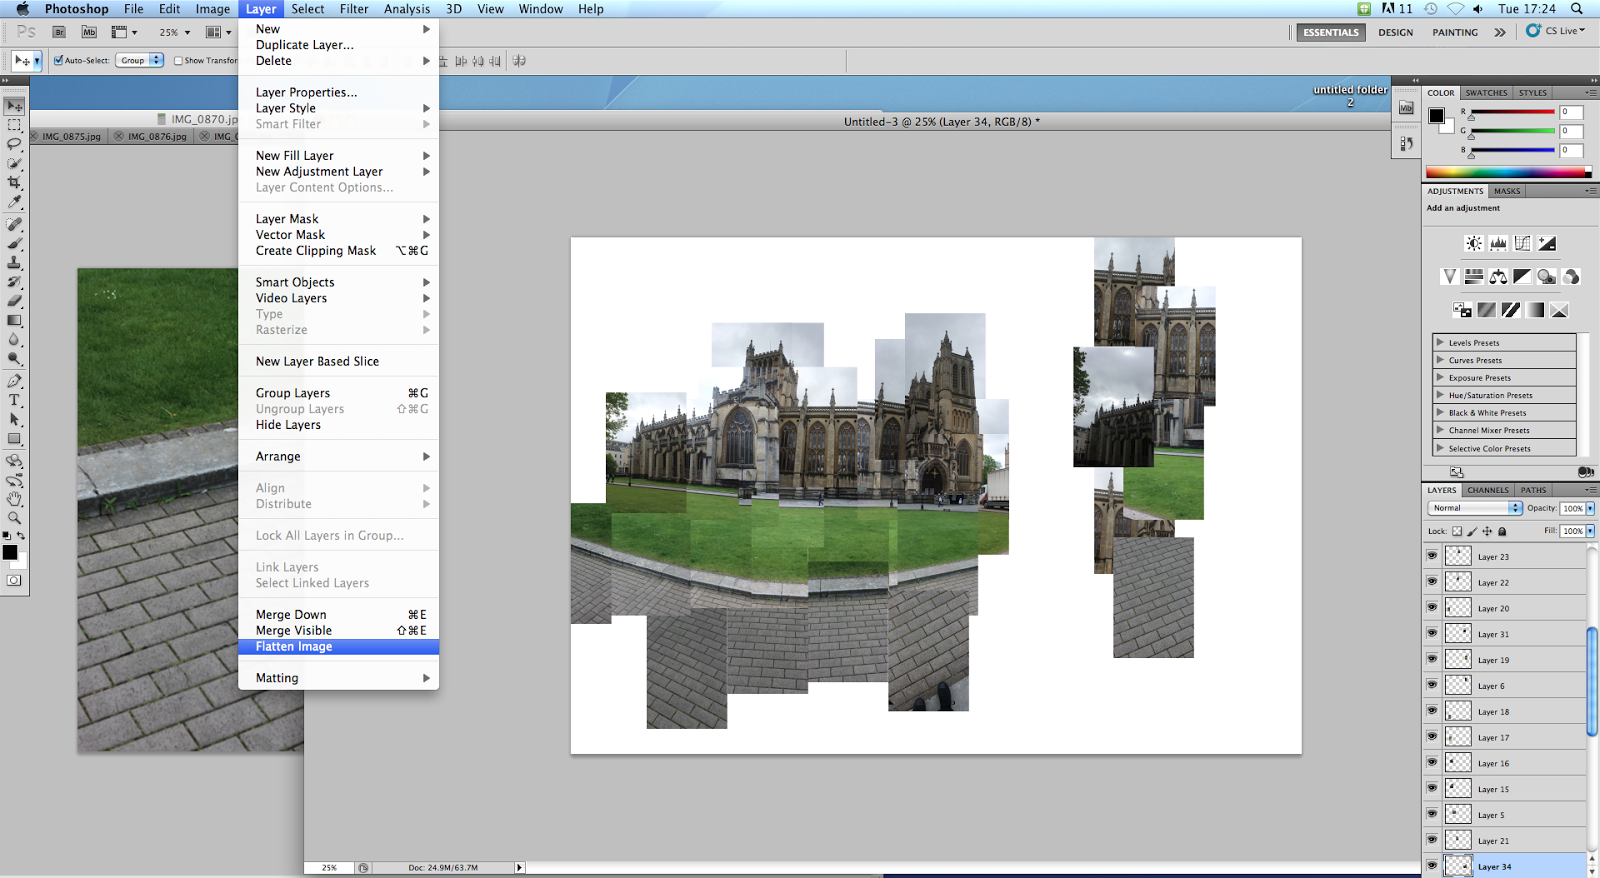
Our task was to go out around Bristol and take a variety of photographs which we would then use to create a Hockney Joiner using Photoshop.


Once I was happy with the positioning of the photographs I flattened the image to reduce the file size and to make it one Image.

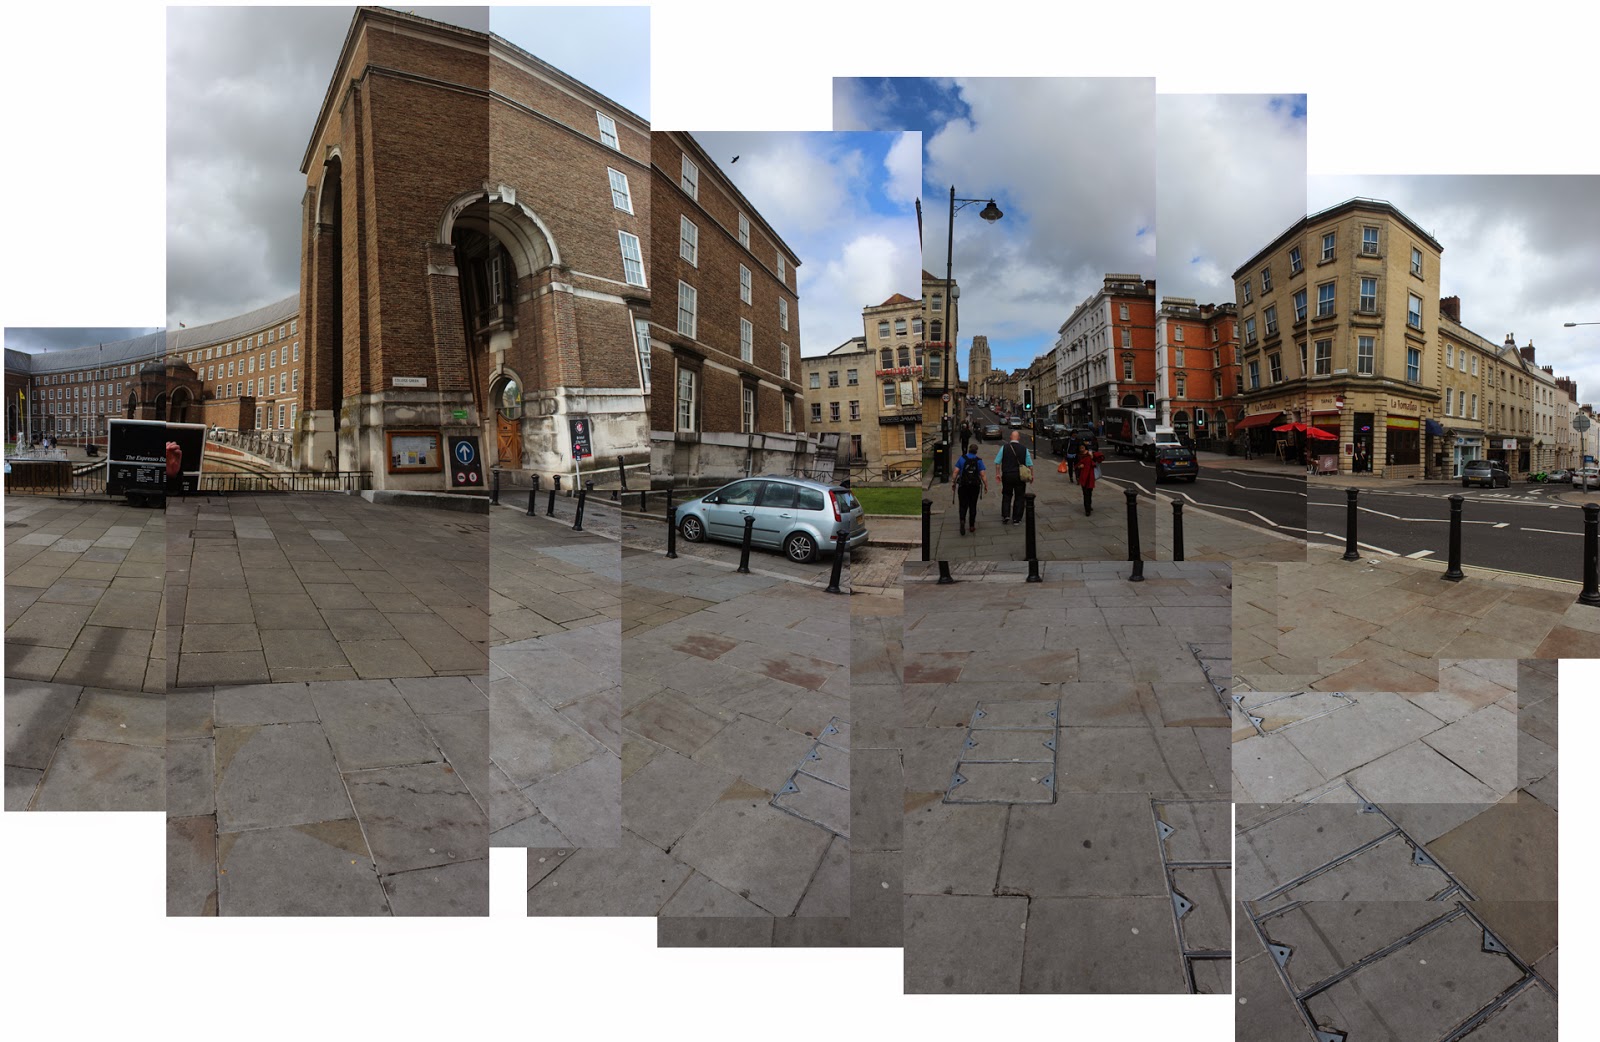
As you can see I chose to do three Hockney Joiners. This is because I wanted to capture the main sections of College Green and experiment with different building types and roads with vehicles and people.
 I am very pleased with the outcome of my Hockney Joiners because they are all quite quirky and change what would be a standard and dull image into a something interesting to look at. Also in the first and third image, I included my feet in the photograph to create perspective and to follow the style of Hockney.
Hockney Joiners for Cheats
There is a simpler way to create a Hockney Joiner without having to take many photographs and then putting them all together into a big collage, which can be very time consuming. With the help of Photoshop, there is a cheaters way to make a Hockney Joiner using only one photograph.


Then on the blank square I went to Select > Select All. Once the whole square was selected I went to Edit > Stroke. In the dialogue box I selected 2 pixels and made sure the color was black. This created a black band around the edge of the box which will add to the image upon image effect. I then went to Select > Deselect.

The next step is to turn the blank square into a pattern. I did this by going to Edit > Define Pattern and title it as 'Grid'. Once this was done I could close the blank square as it was saved as a pattern.

I then created a new layer and went to Edit > Fill. In the dialogue box I selected "Pattern" and chose the pattern I created earlier titled 'Grid'.
This then covered my image in grid squares.

I then switched the color round on the grid square by pressing the apple key and the letter I. This caused my grid to turn black. In the menu I then chose 'Screen' which made it so I could see through the grid square. I also cropped the image so that each grid square was an even size.

The next step was to turn each square into it's own layer. This is quite a repetitive process the 'Actions' process in Photoshop makes this an easy task. I selected the first square using the 'Magic Wand Tool' and then went to Window > Actions. In the actions palette I selected 'New' and named the action "Chop". I then clicked record so that it would record all of my actions. The action I recorded was 'Background layer > Apple Key + J > 8 Key (80% Opacity) > Grid layer'. I then clicked stop to stop recording my actions.
The grid layer is already active so all I had to do was select my action and press play and the process I recorded was repeated again. I then proceeded to do this for each square.
Once each square was turned into an individual layer I deleted the grid layer as this was no longer needed. I then created a new layer and went to Edit > Fill and chose white. The image will look slightly washed out but this because the opacity is set to 80%. I then selected the 'Auto-Select' option and proceeded to rearrange the image and change the angles of the individual squares to turn it into a Hockney Joiner.


To add to the effect of the Hockney Joiner I selected random layers and added a drop shadow effect to them to make it look as if it is a collage with many different photographs one on top of the other.
As you can see the image now looks like a Hockney Joiner image. The final step in completing the image was to flatten the image to turn it into one layer. This is to reduce the image size.
Evaluation
Overall I really enjoyed experimenting with the Hockney Joiner photography. I found that I much preferred the original way of making a Hockney Joiner by taking a number of photographs and then putting them together one by one. This is because I found it a lot easier because the process was a lot less complicated and more exciting as it was fun to go out and take the photographs and slowly putting them together to see the final outcome. I struggled with the cheat Hockney Joiner as I struggled to get my head around the process which I found frustrating. Also the process is a lot less exciting because you only use one photograph and so essentially know how it will turn out. I would definitely like to use Hockney Joiners again and experiment with ways to incorporate it into other styles of photography.
Project 4 - Defocused

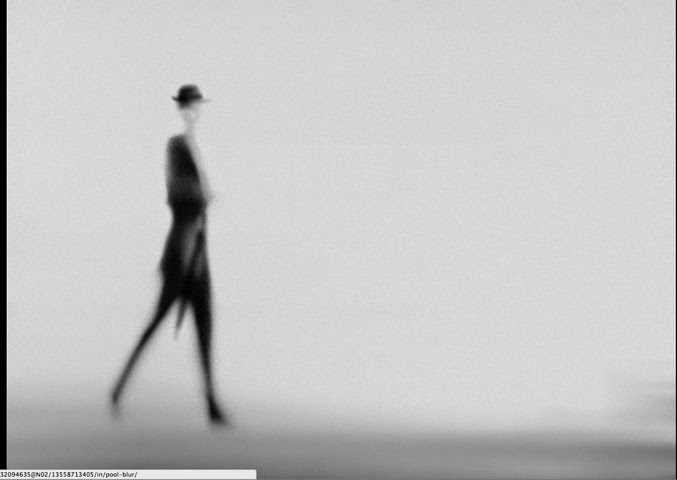
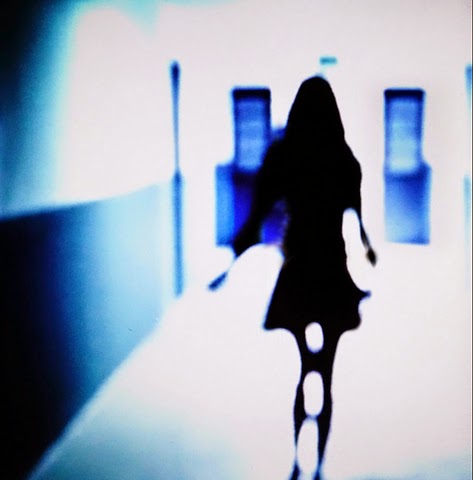 De-focus is where a photograph has been deliberately taken out of focus. Creative and interesting images can be produced with different types of lighting which can create a unique effect on the model. As seen in the photographs I found during my research, they all have an imaginative style that would have taken a lot of experimenting to perfect.


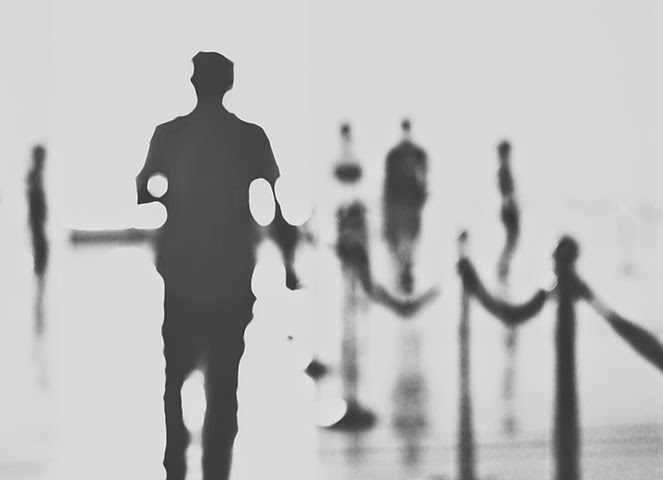
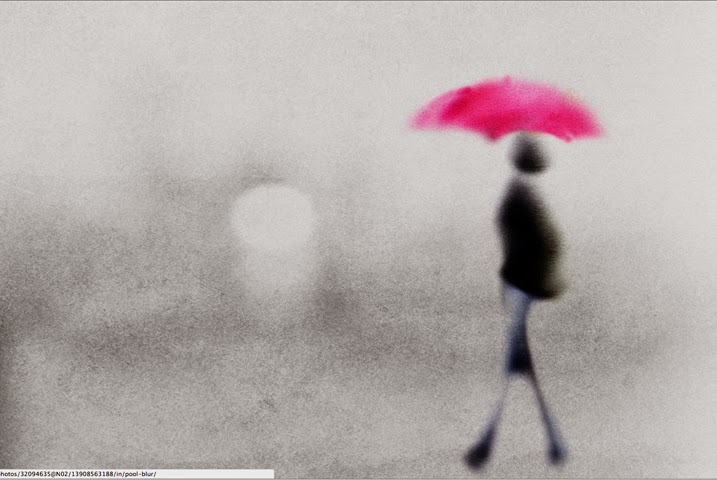 The thought process behind these images makes them more interesting because they are purposefully meant to be like that. Defocused images can be quite mysterious and alien like. For example, The photograph with the blue background is quite mysterious and almost dream-like.
Similarities
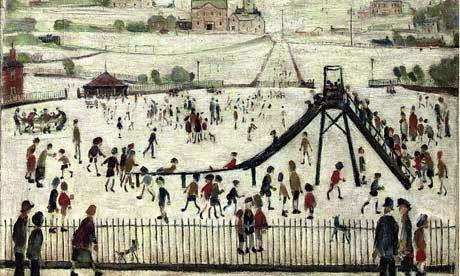
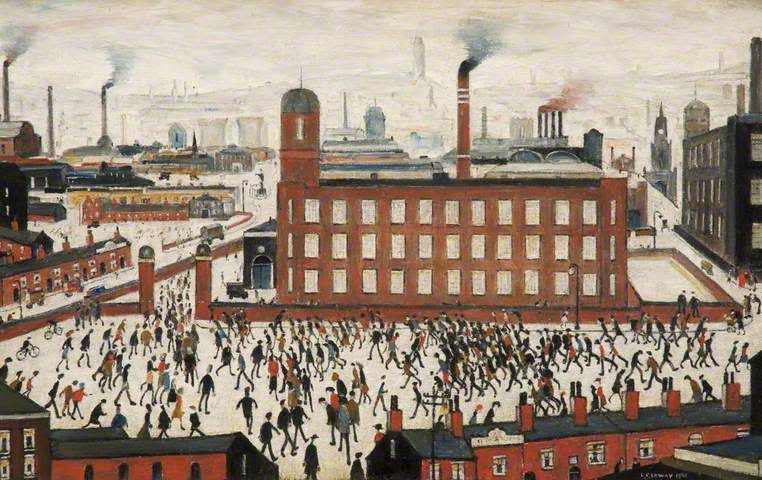 The defocused images hold a lot of similarities to Laurence Lowry's paintings. Lowry was famous for painting industrial towns in North-West of England during the mid 20th Century. His paintings have a distinctive look described as "match-stick men" which also fits with the description of defocused images. Lowry's paintings have a unique and different style to them which gives them a surreal effect. The way in which Lowry painted the people gives them a distinctive stick like figures which look very much like the defocused effects.
Studio Setup
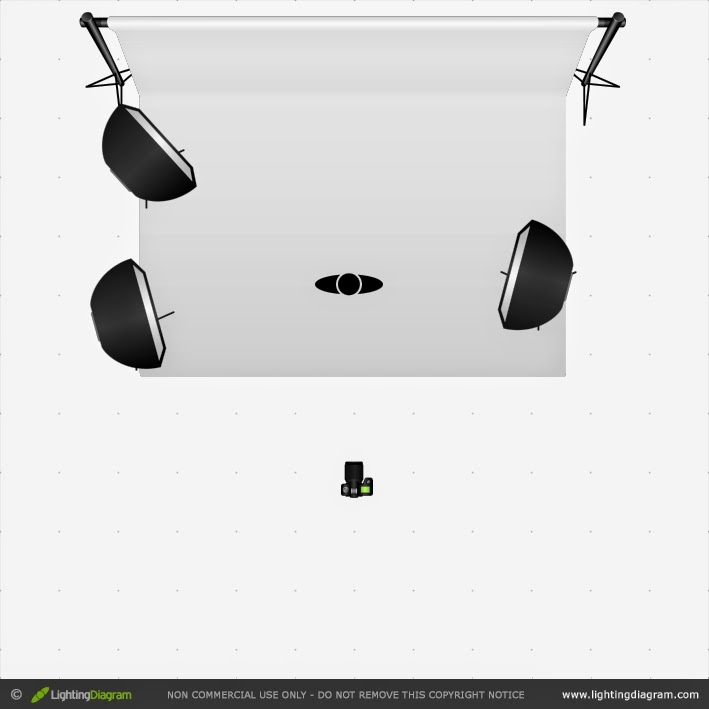 To achieve the best effects the lighting and the model needs to be in certain positions. First of all the backdrop and floor needs to be completely white so that the light gets reflected back on to the model to create an over-exposed effect. The light needs to be facing the backdrop so that it is not clear in the image and just looks like a pure white background. The two lights that face inwards are used to over-expose the model and create the weird stick effect.
Technical Information
The camera should be set to shutter speed 1/60 sec and have an aperture of f4 / f5.6. If the aperture is any smaller than this the camera will attempt to correct the defocus through depth of field. The lights need to be set to a reading of f11 / f16 as this allows for an even background. The difference between the camera exposure and the background reading ensures that the background will be over-exposed with much of the light flaring and wrapping around the model.
Final Defocused Images

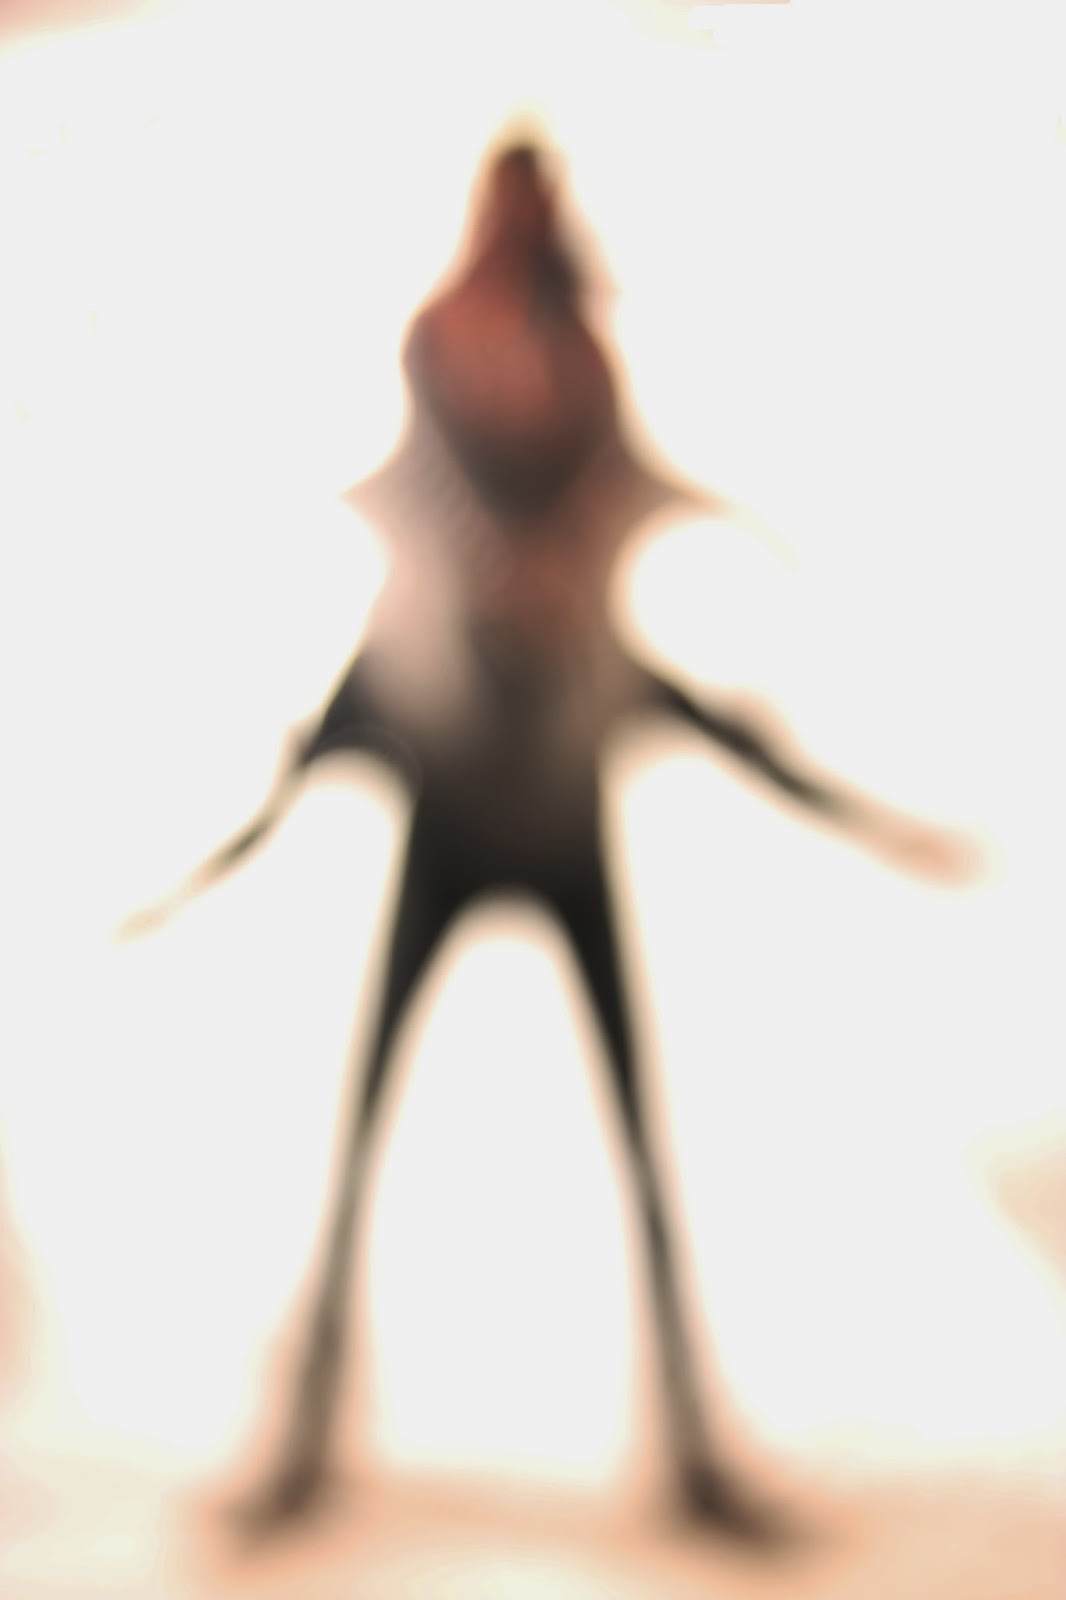
In this photograph Camilla is standing with her arms outstretched to the lights that are either side of her. This creates the effect of her stumpy and non-existent arms. She is stood further away from the camera which is why her body is completely out of focus and distorted with her arms, neck and head almost completely gone. Camilla's head is a different shape because she was wearing a spiky hat which has made her head slightly the same shape as a pineapple which makes her look interesting and unique.
I chose this photograph as one of my best photos because of the interesting shapes mostly made by Camilla's head and arms. Also because Camilla's body is very distorted and different it leaves a lot for the viewers to imagine and interpret in their own way.

In this photograph Jack is sat facing the camera with his chest leaning against the back rest of the chair. His legs are spread outwards and his hands were cupped under his chin. Due to Jack having a short sleeve t-shirt on, his arms and face reflect the light which is why his face and arms have all blended into one.
I chose this photograph as one of my best photos because it is a very symmetrical photograph. Both sides are identical to each other which was a very lucky coincidence. Also I like the way Jack's arms cross over his chest but they are lighter than the chair, so it creates a nice two-toned effect.
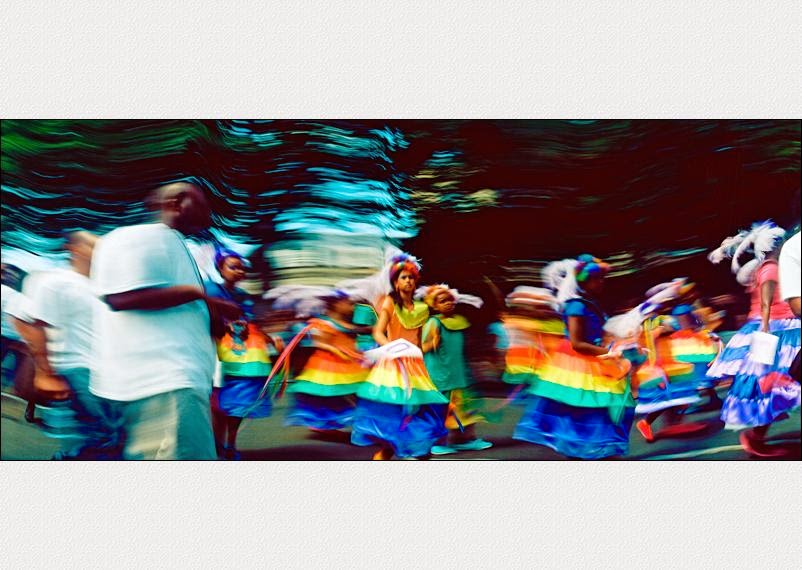
In this photograph I got Camilla to jump on Jack's back so that I could experiment with merging their two bodies into one. Jack was leaning forward and then Camilla was holding onto his neck and her legs were sticking out to the side. As you can see, their bodies have merged together to create an interesting and unique shape.
I chose this photograph as one of my best photos because I liked the shape created by Camilla and Jack as it looks unnatural but interesting. This is because the lighting has made both Camilla and Jack look elongated and almost alien like.
Evaluation
I found defocused photography to be quite easy because there wasn't much need to capture the fine details of the subject, it was more about creating unique shapes with the help of an out of focus camera and high exposure. I found it fun to experiment with the positioning of my models to get the most unique photo. Unfortunately defocused hasn't been my favourite topic because I prefer capturing the fine details of my subject. At times I struggled to engage with the topic but the research I did definitely helped me to understand the purpose of defocused photography and also how I wanted my images to turn out like. If I had the chance to do defocused photography again I would spend more time working with props and finding props that most compliment my photographs to create the most unique and imaginative images.